PDF version of this article: microservices-backend-local-development-guide.pdf
Solution which will be proposed during these workshops was created to simplify full process of developing applications. Main target of it is to reduce development time lost to play with the infrastructure in all teams: development, qa, and operations. We will also try to answer one important question - When to use a monolith and when to use microservices?
Agenda
-
Start 9:00
-
Section 1:
-
Architecture
-
Automation
-
Configuration
-
Service Skeleton
-
Readiness Checklist
-
Documentation
-
Services
-
Mockups
-
Application Monitoring
-
Application Security
-
-
Coffee break 10:00 - 10:15
-
Section 2:
-
Book List API (demo + practice)
-
-
Coffee break 11:30 - 11:45
-
Section 3:
-
Book Admin API (demo + practice)
-
-
Lunch 12:30 - 13:00
-
Section 4:
-
Backend For Frontend (demo + practice)
-
-
Coffee break 14:15 - 14:30
-
Section 5:
-
What’s Next
-
Cleanup
-
Q&A
-
-
Ends between 15:00 and 16:00 - depends on Q&A session
Requirements
For this Workshop you will be working as all groups: Developers, QA, and Infrastructure - and you need this software to be installed:
-
Languages
-
GO (programming language used for example projects)
-
Ruby (documentation)
-
Python (automation and mocks)
-
-
Services
-
Docker CLI, Docker Engine / Colima / Podman, Docker Compose / Podman Compose, Docker BuildX (containers)
-
-
Tools
-
Brew (package management)
-
Ansible (configuration management)
-
docker-compose (container management)
-
kubectl (kubernetes cli)
-
kubectx (kubernetes cli extension)
-
helm (kubernetes package management)
-
k3d (lightweight kubernetes)
-
k9s (kubernetes management tool for cli)
-
trivy (container security scanning)
-
bruno (api testing tool)
-
syft (SBOM tool)
-
You can find how to install this software here: https://local-workshops-requirements-guide-b9c7de.gitlab.io
Windows users should use WSL 2, or install VirtualBox, and install linux system in the VM.
| In case if you will plan to experiment and fork our repositories to your own Gitlab group you will need a gitlab runner working on your laptop/machine connected to this personal group in the Gitlab. You will find documentation how to create it here: https://gitlab-runner-k3d-guide-1aca27.gitlab.io |
Why those requirements
Like mentioned in this workshop you need all of this software and tools installed but in the real life not but I encourage you to always have all software required by project to be installed and configured also in the real life.
GO - This language will be used normally only by GO Developers and our main example applications are created in this language. Testers and Infrastructure do not need it normally installed but should in a case when application they are working with is written in this language. If you are using other language for your backend services you can easily adapt used examples and files to it. There are already examples for some of them but more is always welcome. Please contact me If you like to create examples for your language and framework you are using normally.
Ruby - This language in our case will be used only by tool we are using here for the documentation creation. No one in the team needs to know this language. It is strongly recommended that all team members be responsible for creating and maintaining documentation.
Python - This language is used here by QA as our MOCK examples were created using it. Our configuration management tool is also requiring this language to work. QA developers needs to know this language, rest of the team only needs it to be installed.
Docker Cli - For Linux and Windows users Docker Cli is part of the Docker package. Mac users install it as a docker package which is missing all the rest. We will be using docker to manage our containers during this workshop.
Docker Engine - For Linux and Windows users (WSL2) Docker Cli is part of the Docker package. Mac users needs to install a replacement like for example Colima. It is used by the Docker CLI to physically manage containers.
Colima - This is low weight Container Engine compatible with Docker Cli. In our case Mac users using it instead of the Docker Engine which currently is available on Mac only through paid Docker Desktop.
Podman - Podman is an open source container, pod, and container image management engine. Podman makes it easy to find, run, build, and share containers.
Docker Compose / Podman Compose - Easy to use simple orchestration tool for managing and configuring multiple containers.
Docker BuildX - This is a Docker CLI plugin for extended build capabilities with BuildKit.
Brew - This tool is only required in our setup if you choose it to install anything we need.
Ansible - This configuration management tool will be used by all groups as our flow is based on it.
pipenv - This tool which is used as python dev workflow for humans will be normally only used by QA when working on Mocks.
trivy - This tool is used to scan containers for security reasons
All those tools:
kubectl - Kubernetes CLI will be used to check if our cluster works
kubectx - CLI tool extending kubeclt is used by our local deployment script to be sure that proper cluster and namespace is used.
helm - Package manager for Kubernetes used to deploy applications to our kubernetes cluster.
k3d - CLI wrapper for the K3s clusters which we will use to create out local kubernetes compatible K3s cluster
k9s - terminal based UI to interact with Kubernetes clusters
will be used mostly by the Infrastructure but also in many times by Developers and QA when working with Continuous Deployment.
| It is a good practice to know at least of basics of everything in the project what ends in having all software and tools installed on your local environment which are used by the project. I strongly advise you to be prepared to run anything that other team members might run in their local environments in your own local environment. |
Microservices Overview
Architecture
|
First question you should ask yourself is: Do I really need to use microservices and why not to use monolith instead? Let’s look at this workshop design and then answer this question. |
Our target backend simple architecture will be looking like this:

We have three backend microservices prepared which we will be using in our workshop:
-
Our BFF Service will be simulated with Book API Gateway Service.
-
Our API-1 Service will be simulated with Book List API Service.
-
Our API-2 Service will be simulated with Book Admin API service
In addition, our AP1-1 Service will have a mockup service prepared Book List Mockup API Service, and our API-2 Service will also have a mockup service prepared Book Admin Mockup API service.
We will be also introducing during this workshop a Service Template which can be used to create new services in the similar way, and Helm Chart which will be used to deploy those services to the Kubernetes and K3s.
Because in this workshop we will be using GitlabCI we will introduce Components of GitLab CI Components.
Another topics which are more and more important in the current workflow are Application Monitoring and Application Security. We will look at one of the basic Application Monitoring tool called Sentry which in case of this workshop will be DevOps Training Info Sentry. In case of Application Security we will focus only on the Container Scanning with tool called Trivy.
Our design have some very important reasons which I never explained in the previous editions but were always asked.
-
BFF – simulates an application gateway and adds security to the remaining microservices. This is usually unnecessary, and if you opt for a more monolithic design, you can simply replace it with the main application by simply adding the required code.
-
Book List - this is essentially our main application and the main API for the frontend. his is a microservice, which is really what our service will be if we opt for a more monolithic type of infrastructure.
-
Book Admin - essentially simulates an overly simplified external identity and access management solution.
I deliberately did not add any additional microservices after Book List because I consider it a terrible solution. Why:
-
each chained microservice is adding network overhead per user call which is not small, without additional security is between 1 and 10 millisecond but with current security requirements can be between 50 and 100 milliseconds,
-
each chained microservice increases cpu and memory used per user call, and this increases dramatically with current corporate security requirements like for example encryption between microservices,
-
when user will have issue - finding what went wrong is very hard - you need to find which microservice in the chain failed and why,
-
it is super easy to create distributed monolith which have all cons monolith have plus all cons microservices have - from my experience this is hell.
The answer is simple: in most cases, you need a simple infrastructure, including a front-end service, a back-end service, and an identity and access management system. You can always add a special service, such as an asynchronous image thumbnail system, when needed.
|
Now one additional advice. When microservice architecture is something your team needs to use or implement please find more about it. Good start will be to search more advices and good practices, a good start can be to attend microservices-architecture-the-complete-guide uDemy course created by Memi Lavi. |
Automation
DevOps methodology which is currently used in many projects requires us to automate everything we can. In this project we will be using many tools and practices connected with this practice.
Our example projects have a lot of scripts which automates our work. Please remember that to show this concept in the as simple as possible way we are not using more efficient workflows.
Another thing important to mention is that in a normal projects even if this simple method will be used there will be much fewer files. We have that many because we plan to show many ways of working.
|
Most common practice is to have one script which should just have many commands. This can be achieved very easily with tools like make[1], maven[2], gradle[3], and many others. Please remember that all team members will need to know how to extend and modify those scripts. Sometimes bash is the easiest for all option, and we will use it in this workshop. |
Build
Let’s start with explaining our build related files which we are using to build our binaries and containers
- scripts/build.sh
-
This script have inside command which is building our applications for the OS and architecture we are using at the moment. It will be used during normal development by a developer to generate fast a new version of the application we are working at the moment. It can be also used to generate version strictly for a linux with adding a command to it. It can be very simple like for our Frontend example application or more complex like in our Backend applications examples.
- scripts/build-multi-stage-container.sh
-
This script is automating process of building docker image based on the multi-stage docker file. In our example this script is used for our K3s local cluster using multi-stage docker file:
multi-stage.Dockerfile. This flow shows that our application can be built for desired architecture and operational system easily just by having a little more complex docker file. - scripts/build-single-stage-container.sh
-
This script is automating process of building docker image based on the single-stage docker file. It is the most basic and commonly know flow. We are using this script to check locally if our build process will NOT FAIL in the Continuous Integration pipeline and it uses file:
single-stage.Dockerfile. - multi-stage.Dockerfile
-
Example of Dockerfile which is building service in the first stage and using generated binary in the second stage. In our flow this file is used by the
build-multi-stage-container.shand also by our docker compose filecompose-test.yml. - scripts/multiplatform.build-multi-stage-container.sh
-
This script shows case when we wanted to build image for multiple architectures and operational systems. It is just a example which uses file:
multiplatform.multi-stage.Dockerfile. - multiplatform.multi-stage.Dockerfile
-
Example of Docker file prepared to generate image prepared for multiple architectures and when modified also multiple operational systems. This file require Docker BuildX and may not work with other image build tools like for example Kaniko.
- scripts/serve.sh
-
Script which is running our local binary with preselected by us flags
- single-stage.Dockerfile
-
Example of Dockerfile which requires binary to be properly build prior and only copies it to the docker image.
Example responsibility table for it looks like this:
| File name | Main responsibility | Helpers | Comment |
|---|---|---|---|
build.sh |
Developers |
DevOps, Infrastructure |
Developers will prepare build process of their app for requirements created by DevOps based on Infrastructure requirements |
build-multi-stage-container.sh |
Developers |
DevOps |
Main responsibility is on Developers but DevOps sometimes needs to help with creation of this process. Everyone will use this script, and it needs to be bullet prof |
build-single-stage-container.sh |
Developers |
DevOps |
Main responsibility is on Developers but DevOps sometimes needs to help with creation of this process. Everyone will use this script, and it needs to be bullet prof |
multi-stage.Dockerfile |
Developers |
DevOps |
Main responsibility is on Developers but DevOps sometimes needs to help with creation of this process. |
multiplatform.build-multi-stage-container.sh |
Developers |
DevOps |
This is just an example of multiplatform version of multi-stage related files |
multiplatform.multi-stage.Dockerfile |
Developers |
DevOps |
This is just an example of multiplatform version of multi-stage related files |
serve.sh |
Developers |
DevOps |
DevOps can just help with it creation and maintenance |
single-stage.Dockerfile |
Developers |
DevOps |
Main responsibility is on Developers but DevOps sometimes needs to help with creation of this process. |
Documentation
Documentation related scripts:
- scripts/build-doc.sh
-
This script is created to automate process of creating our documentation which is based in our examples on Asciidoctor[4].
- scripts/serve-doc.sh
-
Serves our generated version of Asciidoctor documentation.
Example responsibility table for it looks like this:
| File name | Main responsibility | Helpers | Comment |
|---|---|---|---|
build-doc.sh |
Technical Lead |
Everyone |
We are assuming that this is technical documentation created by everyone in the team and that PM at least will be checking that this documentation is alive |
serve-doc.sh |
Technical Lead |
DevOps |
DevOps can just help with it creation and maintenance |
Our Documentation files will be stored in the doc folder.
|
Local Configuration
We will be discussing how our configuration works a little in the next section.
Local Configuration Management related scripts:
- scripts/local-configure.sh
-
This file is used to generate all configuration files we will be using in the examples for all environments we will be playing with in our example. It is part of our Infrastructure and Configuration Management automation and will be explained in the next section.
- ansible/local-playbook.yml
-
This is Ansible Playbook file used by
scripts/local-configure.sh. It is part of our Infrastructure and Configuration Management automation and will be explained in the dedicated workshop session. - ansible/local-vault.yml
-
File with variables for Ansible with encrypted by ansible vault secrets. It is part of our Infrastructure and Configuration Management automation and will be explained in the dedicated workshop session.
- ansible/requirements.yml
-
Ansible Galaxy requirements file. We are using it to show to ansible-galaxy from where we need ansible roles to be downloaded. This file is used by
local-configure.shandgitlab-configure.shshell scripts. It is part of our Infrastructure and Configuration Management automation and will be explained in the dedicated workshop session.
Example responsibility table for it looks like this:
| File name | Main responsibility | Helpers | Comment |
|---|---|---|---|
local-configure.sh |
DevOps |
Infrastructure, Developers, QA |
DevOps will create and maintain this file but Developers, QA, and Infrastructure needs to understand how it works as it will be used by them a lot |
local-playbook.yml |
DevOps |
Infrastructure, Developers, QA |
DevOps will create and maintain this file but Developers, QA, and Infrastructure needs to understand how it works as it will be used by them a lot |
local-vault.sh |
DevOps |
Infrastructure, Developers, QA |
This file stores our configuration variables and secrets and is mainly managed by DevOps but Infrastructure, Developers, and QA will be maintaining it too. |
requirements.yml |
DevOps |
Infrastructure, Developers |
This file is maintained by DevOps but Developers, QA, and Infrastructure needs to understand how it works |
Our Ansible roles will be downloaded to the ansible/roles folder. Those roles need to be created and maintained by DevOps and Developers with a help from Infrastructure.
|
|
We created our Configuration Management based on the Ansible for a good reason and a lot of things connected with it have meaning which is impossible to explain during this workshop and will be explained during the dedicated session for Infrastructure and DevOps. In most of the cases you will need to use a different way to achieve automated configuration of your application. If your project do not know how to achieve multienvironment configuration you can use our example as a starting point to find something which will work for you. |
Local Orchestration
Docker Compose related scripts:
- compose-k3s.yml
-
We are using this docker compose to serve our Swagger Editor and UI when only using K3s based local environment. This is not a proper way of doing this - we should have separate K3s based setup for this but there was no time to prepare it.
- compose-local.yml
-
We are using this docker compose file for local development of our service.
- compose-test.yml
-
We are using this docker compose file for local testing and checking if our app is deliverable. In the normal flow this file will be the only file you need.
Example responsibility table for it looks like this:
| File name | Main responsibility | Helpers | Comment |
|---|---|---|---|
compose-k3s.yml |
DevOps |
Developers, Infrastructure |
As this file is mainly for Infrastructure for testing DevOps with Developers will make it ready |
compose-local.yml |
DevOps |
Developers |
Since this file is intended primarily for developers, they need to help DevOps create it in a way that suits their needs |
compose-test.yml |
DevOps |
Developers, QA |
Since this file is intended primarily for QA, Developers need to help DevOps create it in a way that suits their needs |
Local Testing
Local Testing related scripts:
- scripts/local-test.sh
-
This file is used to start our local integration/feature tests of our service. We should always run it before pushing to the remote repository. It is part of our Infrastructure and Configuration Management automation and will be explained in the dedicated workshop session.
- scripts/local-e2e.sh
-
This file is used to start our local e2e tests of our service. We should always run it before pushing to the remote repository. It is part of our Infrastructure and Configuration Management automation and will be explained in the dedicated workshop session.
Example responsibility table for it looks like this:
| File name | Main responsibility | Helpers | Comment |
|---|---|---|---|
local-test.sh |
QA |
Developers, DevOps |
QA will be maintaining this file and Developers and DevOps will be using it a lot and needs good understanding how it works. Additionally, DevOps may give requirements for it to QA |
local-e2e.sh |
QA |
Developers, DevOps |
QA will be maintaining this file and Developers and DevOps will be using it a lot and needs good understanding how it works. Additionally, DevOps may give requirements for it to QA |
Local Scanning
Local Scanning related scripts:
- scripts/local-scan.sh
-
This file is used to start our local container security scanning of our service. We should always run it before pushing to the remote repository.
Example responsibility table for it looks like this:
| File name | Main responsibility | Helpers | Comment |
|---|---|---|---|
local-scan.sh |
Security |
Developers, DevOps |
Security will be maintaining this file and Developers and DevOps will be using it a lot and needs good understanding how it works. However, DevOps may give requirements for it to Security |
Local Deployment
Now we will check our deployment related scripts:
- scripts/deploy-k3s.sh
-
This script is using image crated by
build-multi-stage-container.shand deploying it to our local K3s cluster. With this we can use latest local version of our application in the Kubernetes compatible environment.
Example responsibility table for it looks like this:
| File name | Main responsibility | Helpers | Comment |
|---|---|---|---|
deploy-k3s.sh: |
DevOps |
Infrastructure, Developers |
Infrastructure will help with making this process as compatible as possible with the target production, Developers will help with making this environment running |
|
Our Deployment to Staging and Production Environments is managed by the CI pipelines. |
CI/CD
Now we will check our Gitlab CI related scripts:
- scripts/gitlab-configure.sh
-
This file is used by Gitlab CI to generate configuration file used by our service in the prepared in it testing environment. It is part of our CI automation and will be explained in the dedicated workshop session.
- ansible/gitlab-playbook.yml
-
This is Ansible Playbook file used by
scripts/gitlab-configure.shto generate only those configuration files which are used by Gitlab CI. It is part of our CI automation and will be explained in the dedicated workshop session. - scripts/gitlab-test.sh
-
This file is used by Gitlab CI to start service tests which we are running in the CI pipeline. It is part of our CI automation and will be explained in the dedicated workshop session.
- ansible/gitlab-vault.yml
-
In our case just a symlink to
local-vault.yml.
Example responsibility table for it looks like this:
| File name | Main responsibility | Helpers | Comment |
|---|---|---|---|
gitlab-configure.sh |
DevOps |
Infrastructure |
CI configuration need to be as similar as possible to the real infrastructure configuration and Infrastructure needs to help to achieve this. |
gitlab-playbook.yml |
DevOps |
Infrastructure, Developers, QA |
CI configuration need to be as similar as possible to the real infrastructure configuration and Infrastructure needs to help to achieve this. Because playbook is also generating application configuration Developers needs to help Devops with having this configuration in sync all the time and QA will be using it also in this case and needs to understand how this works. |
gitlab-test.sh |
QA |
Developers, DevOps |
QA need to manage their testing script with a help of Developers and DevOps |
gitlab-vault.yml |
DevOps |
Infrastructure, Developers, QA |
In our case it is a symlink to |
Summary
When creating your own automation based on our examples please consider those changes:
-
Normally you should have only one docker file in the project. We are showing three cases here, and we are ending with
multi-stage.Dockerfile,single-stage.Dockerfileandmultiplatform.multi-stage.Dockerfile. You should have just aDockerfileand choose between multi-stage build process where all is done by docker for a single architecture and operational system, multi-stage build process for multiple architectures and operational system, or just a basic single-stage build process. Having one file calledDockerfilealso simplifies other commands as this is a default file name for a Docker. -
Normally you should also have only one docker compose file or just use local K3s cluster with the help of K3d tool. When you have only one file you should name it
compose.yamlwhich is preferred in your working directory or if you use older standarddocker-compose.yamlordocker-compose.ymlfile names. This will simplify commands as there will be no need to target specific file. -
I strongly advise you to use K3d/K3s when your target environment is Kubernetes based instead of Docker Compose.
-
In the project it is normal that Developer have also a DevOps role and sometimes also an Infrastructure role. When project is bigger fewer roles we have on one person, but this not means you do not need to know what people with other roles do. It is important as people can go on vacation or went sick and someone needs to take their roles for a period of time fast.
Configuration
For a simplicity of the examples our configuration for all environments will be stored in the project repository. To show how to have at least minimum security with this concept we will be using in this example Ansible Vault[7]. Problem is that for a simplicity we will not store this password in a secure way and for this WARNING bellow:
|
Our examples have password you need to use when running NEVER EVER DO THIS!!! |
Ansible which will be used to create configuration files will be run with a prepared script scripts/local-configure.sh this script looks
like this:
#!/usr/bin/env bash
set -e
rm -Rf ansible/roles/secrets.*
ansible-galaxy install -r ansible/requirements.yml -p ansible/roles
ansible-playbook --vault-id @prompt -i 'localhost,' --connection=local ansible/local-playbook.yml
Current goal of the Ansible playbook this script runs is to generate service and helm configuration files for all
environments and store them in the secrets folder.
Ansible role used by the Ansible playbook is downloaded from the other location which can be checked in the ansible/requirements.yml file. This role is using in our examples values stored in the encrypted ansible/local-vault.yml file to generate mentioned upper files.
After using this script you will have those files in the mentioned secrets folder.
Our Services configuration files:
- ci.env.yaml
-
Service configuration which is used in the CI pipeline and our local testing.
- development.env.yaml
-
Service configuration for our development environment
- k3s.env.yaml
-
Service configuration which is used by local kubernetes called K3s. It will be used mainly by DevOps to check if service is deployable.
- production.env.yaml
-
Service configuration for our production environment
- local.env.yaml
-
Service configuration which is used for a local service development where Developer is actively developing service.
- staging.env.yaml
-
Service configuration for our staging environment. Environment which is used before production deployment.
Our deployments Helm values files:
- development-values.yaml
-
Values file used by our helm chart to deploy to our development cluster.
- k3s-values.yaml
-
Values file used by our helm chart to deploy to our K3s local cluster.
- production-values.yaml
-
Values file used by our helm chart to deploy to our production cluster.
- staging-values.yaml
-
Values file used by our helm chart to deploy to our staging cluster.
We will be analyzing those files during a Workshop.
Service Skeleton
This workshop also shows concept of skeleton service which have standardized files inside. You can have more than one skeleton if you also like to go more in dept with language and framework you are using. This concept isn’t new as many frameworks are generating skeletons when creating new app, what we are adding to it is core documentation files, core CI files and automation. Your skeleton service should be created in a way that you should just clone skeleton create new project in the git server and start using it right away to create new service, or use special CLI tool which can use your prepared skeleton to generate new service like for example Cookie Cutter.
Other method is to use your framework project generator and merge result of new project generation process with a template which have files related to the DevOps process which generator do not create.
| Our example of this solution is strongly simplified and available here: https://gitlab.com/devops-training-info/templates/services/generic/standard-service. |
To start understanding how to use this template please check starting version of the README.md file. As you can see there are many sections which you will be modifying for your service.
README.md is also a file where you should store your Production Readiness Checklist we will mention in the next section and also Changelog.
This template example is also introducing in project documentation concept we will discuss later.
You are deciding what is in your template. In many cases developers were just copying previous project to achieve similar goal. We prefer templates as it is more clean solution.
Now please compare template with services which are based on it:
Readiness Checklist
Each our example service is having in the README.md section called Readiness checklist.
This is a list which should be based on your project Non-Functional Requirements list. Our checklist is based on https://github.com/kgoralski/microservice-production-readiness-checklist which is Microservice Production Readiness Checklist project.
Storing it per service in readme guarantees that each requirement will be ticked with a comment in the git repository and all will be documented with in git repo.
For example in a start you will have record like this in it:
-
No shared database between different services - a DB instance should only be used by one service exclusively.
when you will check that yes this is true and this requirement is set - you can just commit change in the repo looking like this:
-
No shared database between different services - a DB instance should only be used by one service exclusively.
with your commit message showing that you checked it and that from your perspective this task is done.
Section by Section example
General Rules - which are more architecture design related
#### General Rules

- [ ] **No shared database between different services** - a DB instance should only be used by one service exclusively.
- [ ] **Not breaking the one-hop rule** - _“By default, a service should not call other services to respond to a request, except in exceptional circumstances.”_. The exception can be for example Backend For Frontend (like GraphQL) which can compose and aggregate data on top of other services.
- [ ] **Prefer APIs to Sharing SDKs**. Try to avoid using SDKs between the services, it is not needed.
Documentation - which is connected with a planned standardisation of your project documentation
#### Documentation

- [ ] **README.md** - self-explanatory service name, how to run it locally and domain/subdomain, bounded context described
- [ ] **Project documentation** - if possible should be kept with a code
- [ ] **Architecture docs / [C4 Model diagrams](https://c4model.com/)**
- [ ] **Development docs** - more detailed version of service development documentation than **README.md** which will be used by new developers to start development of the service and for other teams to cooperate with development team.
- [ ] **API Open Specification** file in root directory or other location known by everyone: `openapi.yaml` file
- [ ] **API versioning** - if needed
Testing and Quality - which is a list created by cooperation between QA, Developers, and product owners
#### Testing and Quality

- [ ] **Linters** (with reports that can be exported to e.g. SonarQube)
- [ ] **Automatic code Formatter or code Format Checkers** (e.g. gofmt, ktfmt)
- [ ] **Test coverage above 70%** (use common sense, just getting to the required number of coverage is not a goal here)
- [ ] **Functional/e2e/acceptance tests** in place
- [ ] **Load Tests** (at least basic ones) especially if higher traffic is expected
- [ ] **Contract Tests** are recommended if there is service-to-service communication via HTTP (example: [PACT tests](https://docs.pact.io/))
Observability - which is in many cases ignored till there is to late and should be planned before project starting and created with cooperation with a Infrastructure team amd all representatives of the Development team.
#### Observability

- [ ] **Logging** in general https://12factor.net/logs
- [ ] **All logs are written to STDOUT / STDERR**.
- [ ] **Logs are written in JSON**.
- [ ] **No sensitive data is logged**
- [ ] **Monitoring**
- [ ] Integration with a monitoring platforms and Dashboards in place.
- [ ] Business metrics added to the dashboards
- [ ] **Tracing**
- [ ] **Distributed tracing configured**
- [ ] **Error tracking configured**
- [ ] **Alerts are configured**
Operations and Resiliency - which will allow you to enter production stage in the future.
#### Operations and Resiliency

- [ ] **Staging environment exists**
- [ ] There is **autoscaling** in place (based on CPU, memory, traffic, events/messages e.g. HPA with K8S)
- [ ] **Graceful shutdown**: The application understands SIGTERM and other signals and will gracefully shut down itself after processing the current task. https://12factor.net/disposability
- [ ] **Configuration via environment**: All important configuration options are read from the environment and the environment has higher priority over configuration files (but lower than the command line arguments). https://12factor.net/config
- [ ] **Health Checks**: Readiness and Liveness probes
- [ ] **Define [SLO/SLI/SLA](https://cloud.google.com/blog/products/devops-sre/sre-fundamentals-slis-slas-and-slos)**
- [ ] Build applications with **Multi-tenancy** in mind (sites, regions, users, etc.)
Security and Compliance - which is also in too many cases prepared to late and our production deployment without security can be blocked.
#### Security and Compliance

- [ ] If your service does need to be accessible through the public Internet
- [ ] **Authentication/Authorization** in place if needed / JWT / Cognito / Auth0
- [ ] Ensure it lives behind our Cloudfront **CDN** (and uses WAF if necessary)
- [ ] **Vulnerabilities scan check**
- [ ] **Does not violate any licenses**
- [ ] **GDPR** data not exposed (https://gdpr-info.eu/art-4-gdpr/)
- [ ] **PII data not logged or stored without any good reason** (ask your DPO) - [Best practices to avoid sending Personally Identifiable Information (PII)](https://support.google.com/adsense/answer/6156630?hl=en), Check Data Retention Policies
Documentation
There is many ways you can create and store your documentation. In this workshop we will be showing concept of storing documentation with a code. To make possible to use this documentation in many ways we are using Asciidoctor which generating it from AsciiDoc files.
AsciiDoctor can generate it in many formats, most common is HTML and PDF. We are visualizing end result using Gitlab Pages. Generated version of the template documentation can be found here: https://standard-service-d001a2.gitlab.io.
This kind of the documentation should also explain all template files you have in a template.
| In many cases you can use any Static Site Generator to generate your in project documentation. Asciidoctor solution we are showing allows also sending generated documentation to the Confluence and is just one of the simplest solutions we know. |
Services
Our services are created using Go[8] Language.
You can check what commands and options each service have by using --help when running generated binary file.
Mockups
This workshop also shows concept of mocking. It will explain also why each microservice should have also Mocked up version. In this particular case we will create our own mockup service ourselves but there are automated solution for this in the market.
In our example we have BFF Service which depends on API-1 and API-2. When we will start using Mockups instead for real microservices even our simple architecture will look much more simple:

-
API-1 is like mentioned before mocked with Book List Mockup API Service
-
API-2 is also like mentioned before mocked with Book Admin Mockup API service
As you can see this will help our teams to test and work on services which depends on other services. With this design you do not need to recreate full architecture with all dependencies to just work.
Our mockup services are created using Python[12] language. In addition, for maximum simplicity we are using also Flask[13] micro framework.
For simplicity we are naming our Stubs as Mocks as this name is in most of the cases used for Fakes and Stubs all the time.

Fake: Implements a shortcut to the external service, for example in memory database instead real database. This method of mocking requires changes in the code.

Stub: It is a hard coded version of the external service and our examples are in the reality Stubs.

Mock: We use mocks only to verify that access was made. Mocks do not hold data.
Application Monitoring
Sentry is a developer-first error tracking and performance monitoring platform.
If you are a Backend Developer you can use this tutorial: https://docs.sentry.io/product/sentry-basics/integrate-backend/ to learn and train how to Monitor your application.
If you are a Frontend Developer you can use this tutorial: https://docs.sentry.io/product/sentry-basics/integrate-frontend/ to learn and train how to Monitor your application.
Because this workshop do not have enough time to do this simple training it is strongly encouraged to do those training home after this workshop.
Now we will just focus on some of most commonly used Sentry views.
To see all Applications we are monitoring we can go to Projects section. We will see basic statistics of our projects like it is shown below:
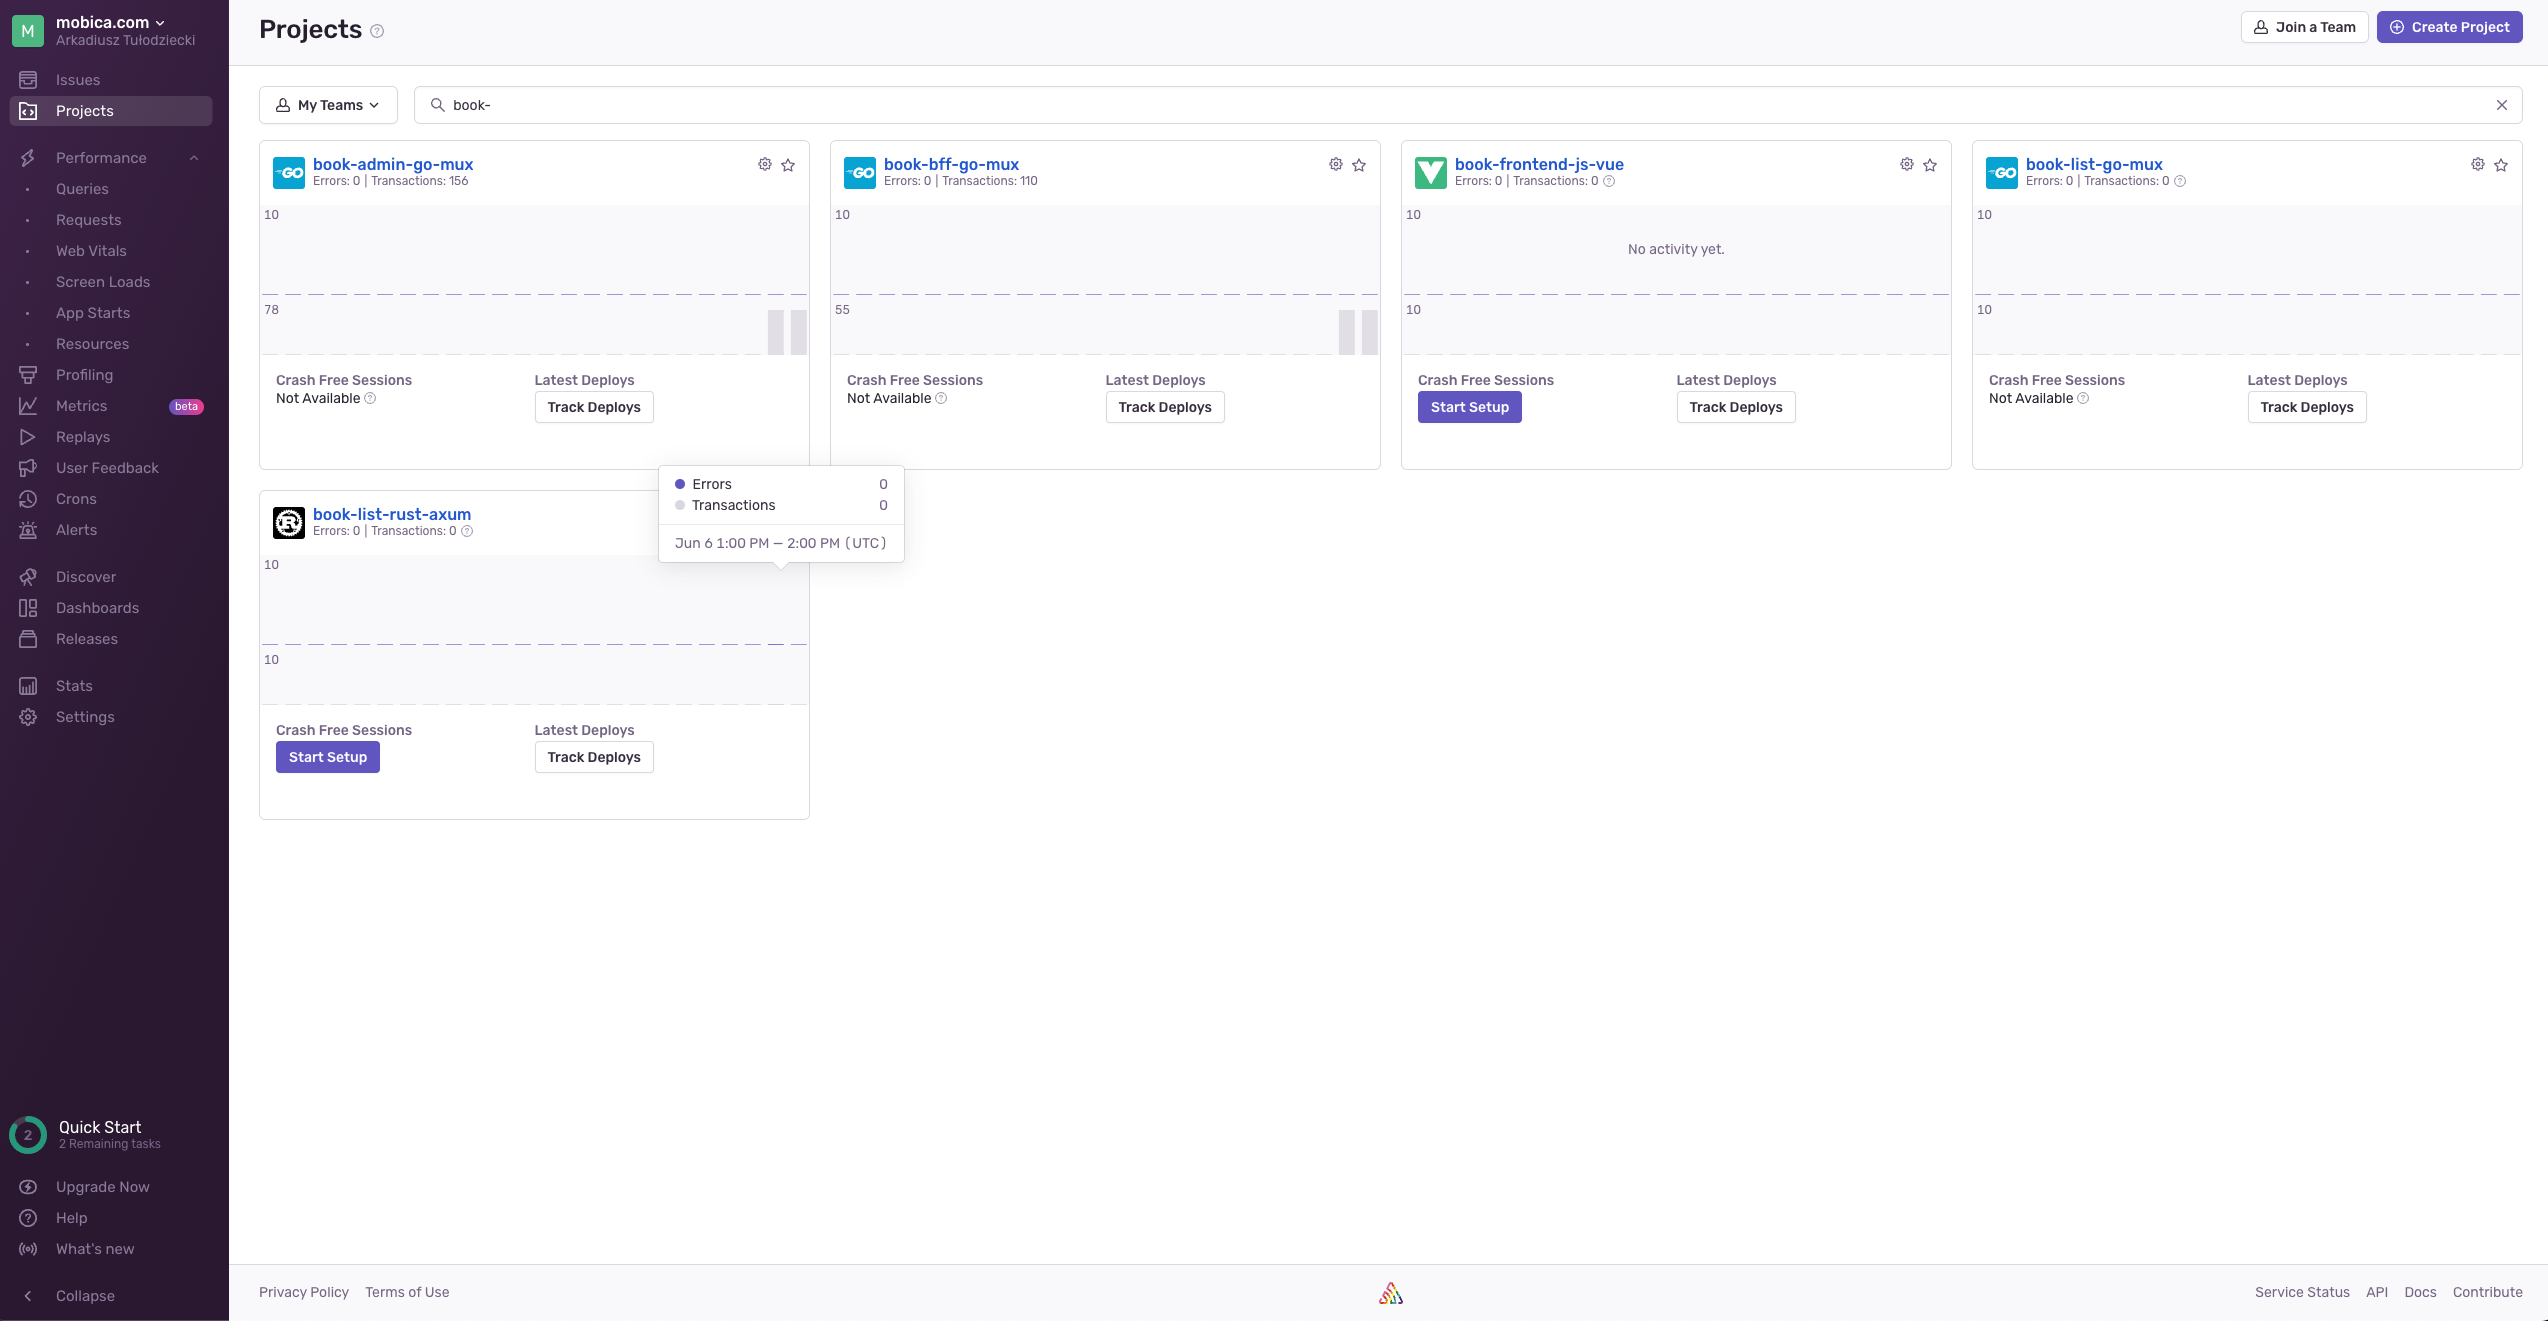
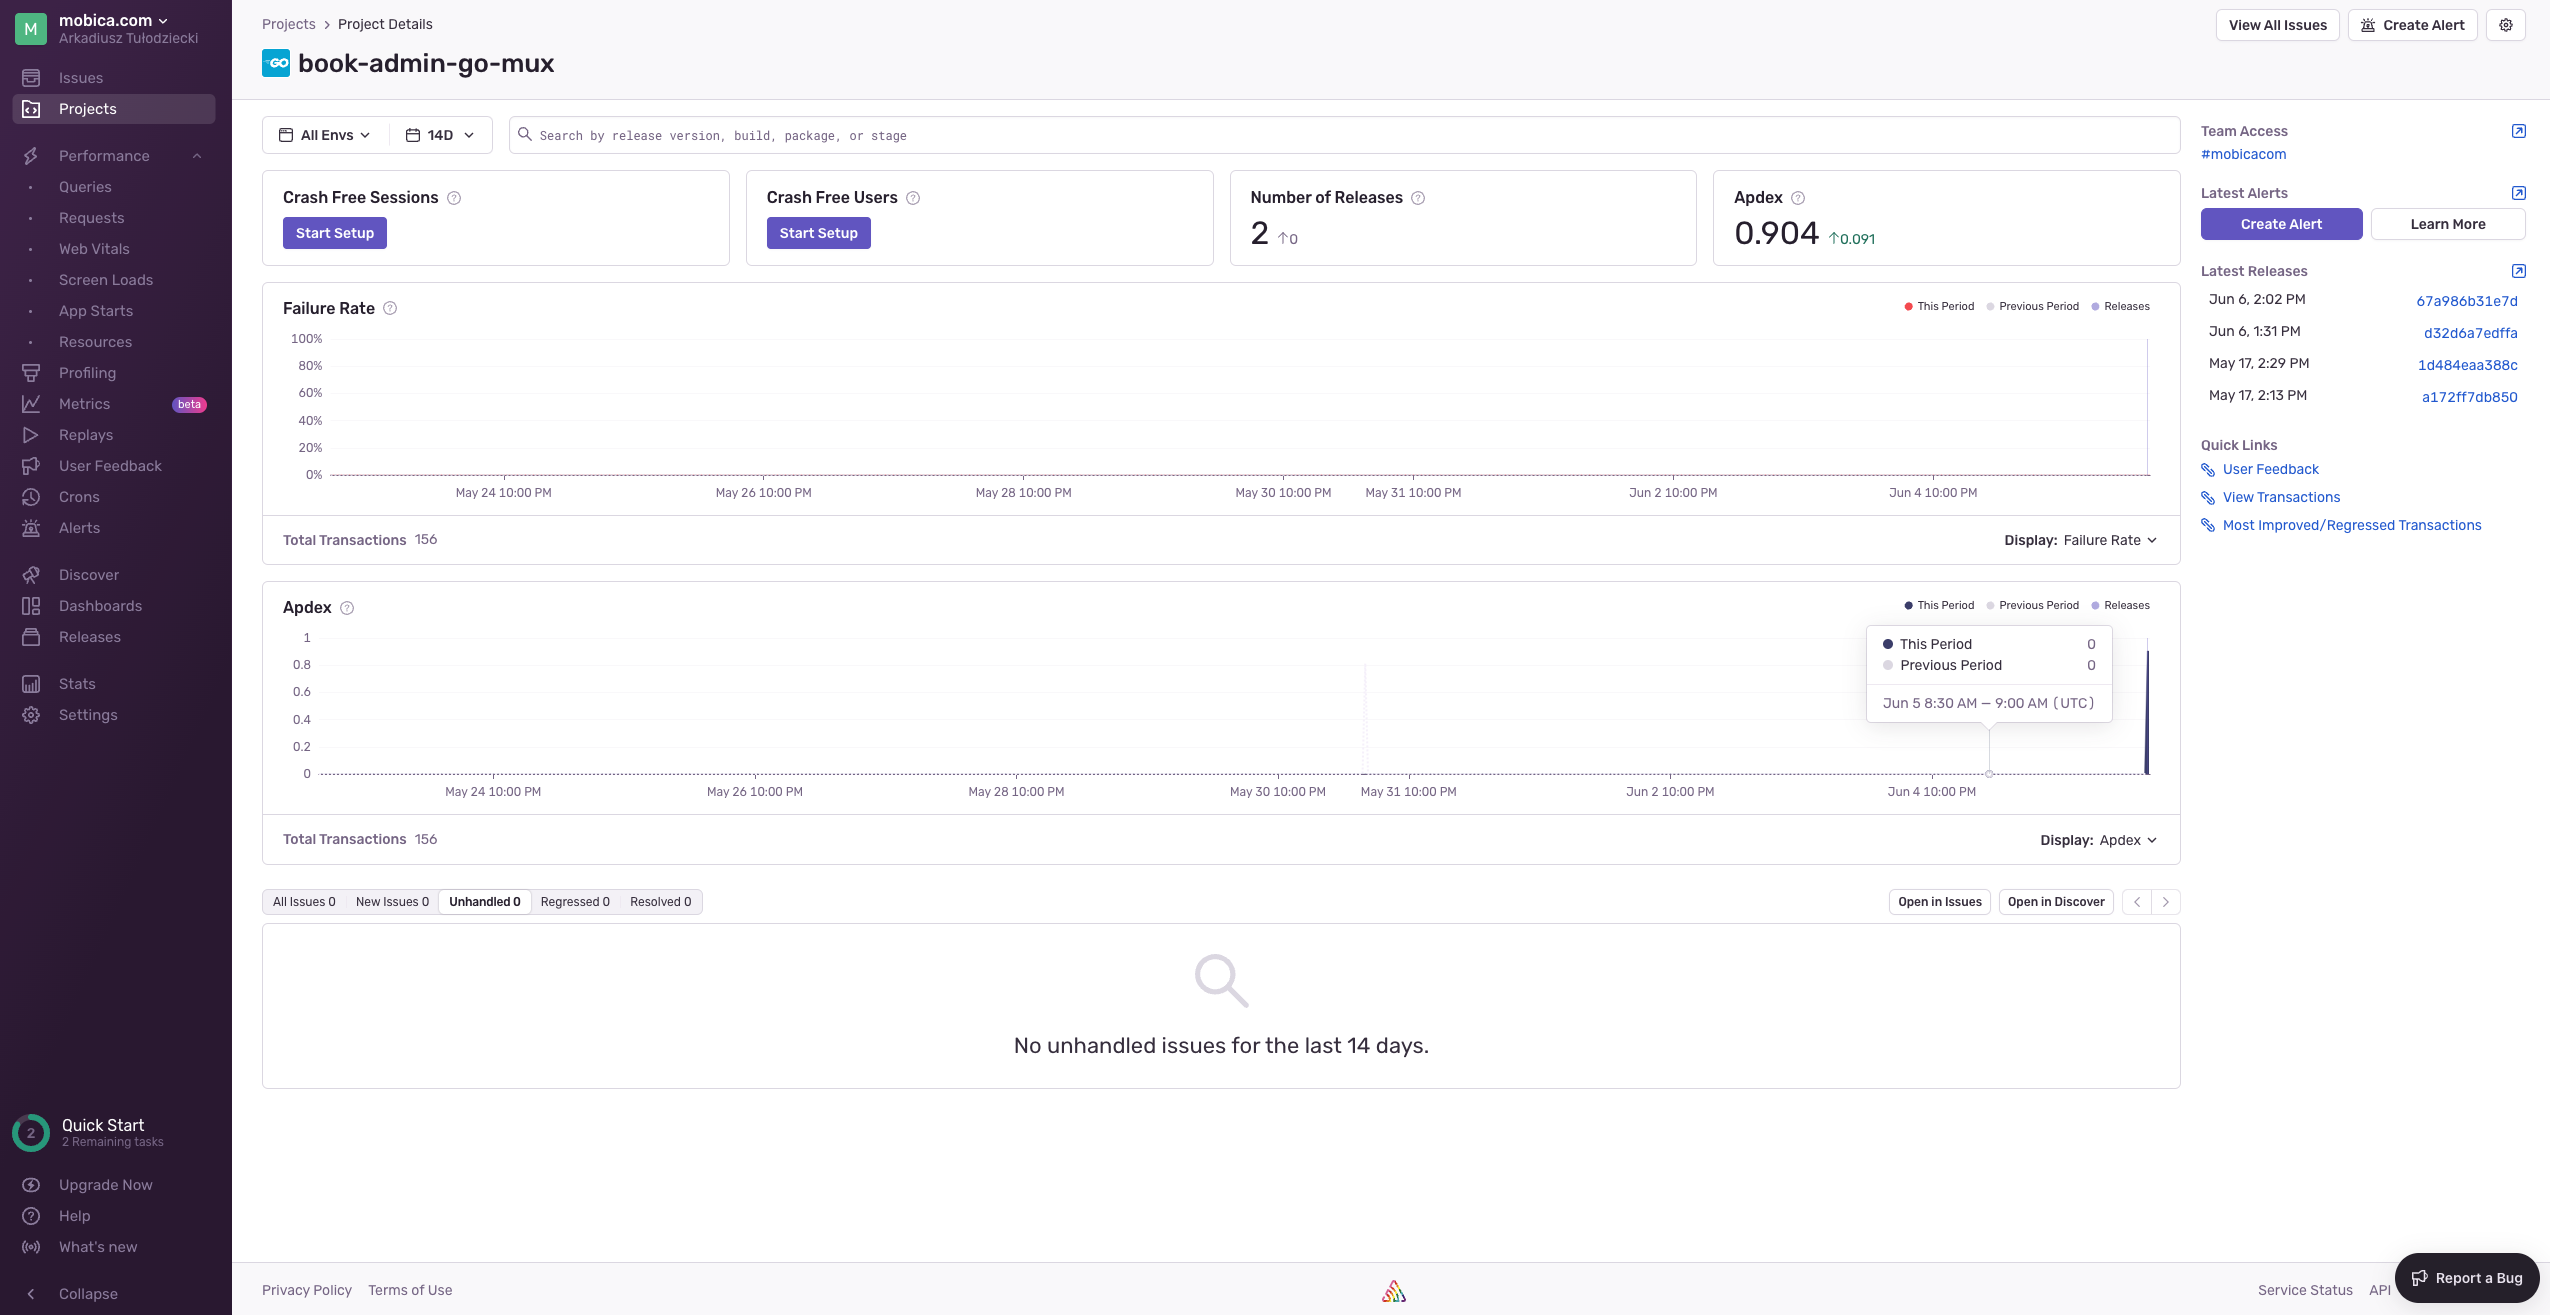
By choosing our Project we can see more detailed statistics of our project like it is shown below:
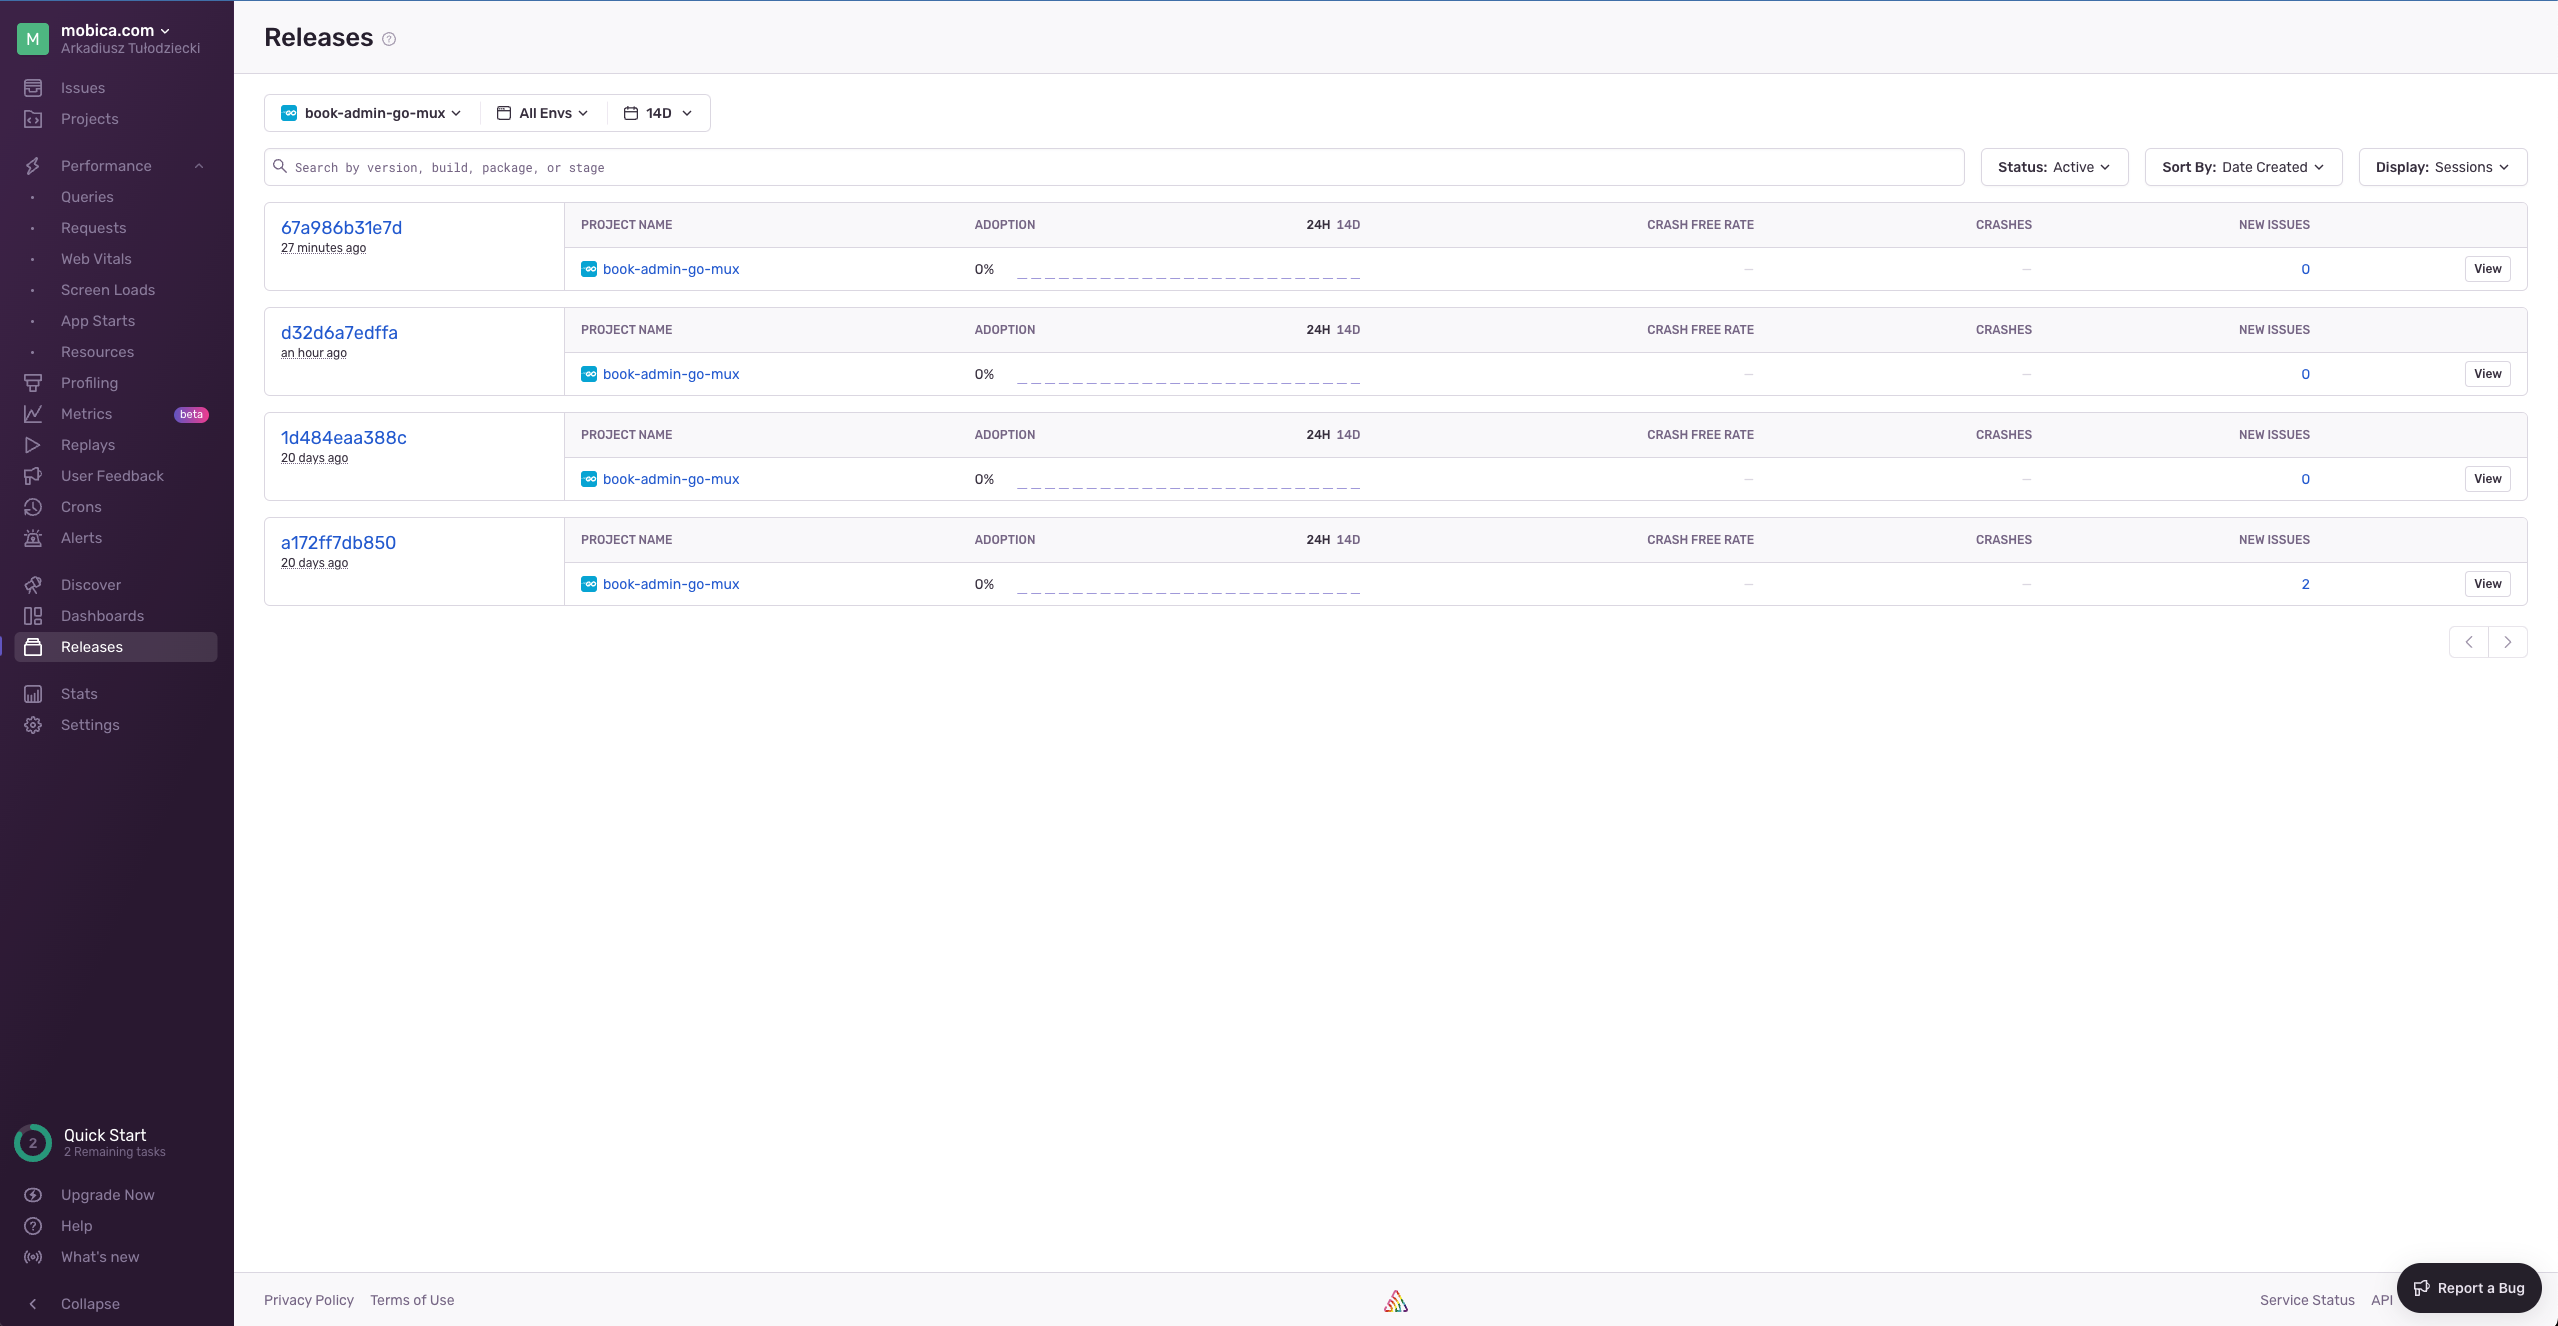
We can also see our releases and see core statistics of each release. For example we can see if release is introducing more issues or if those issues starts to disappear with newer ones. Please look below to see an example:
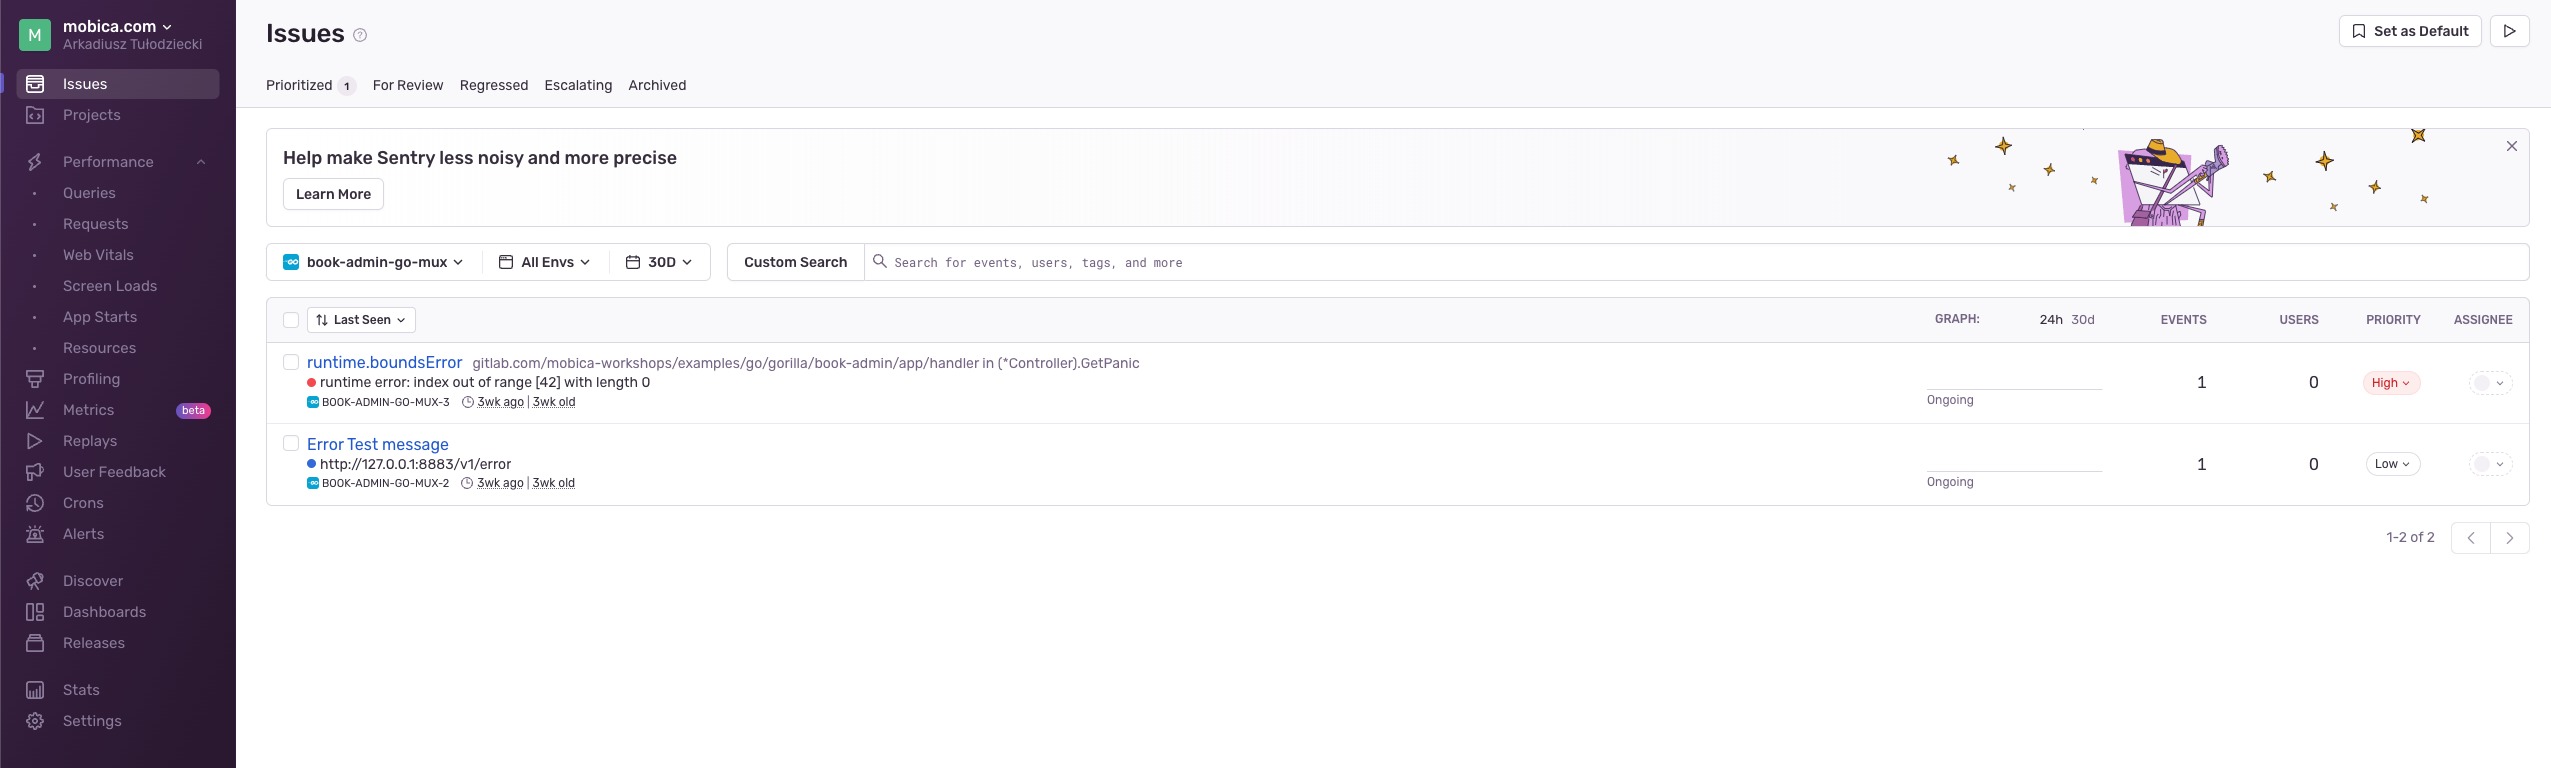
There is also nice view for listing issues per project:
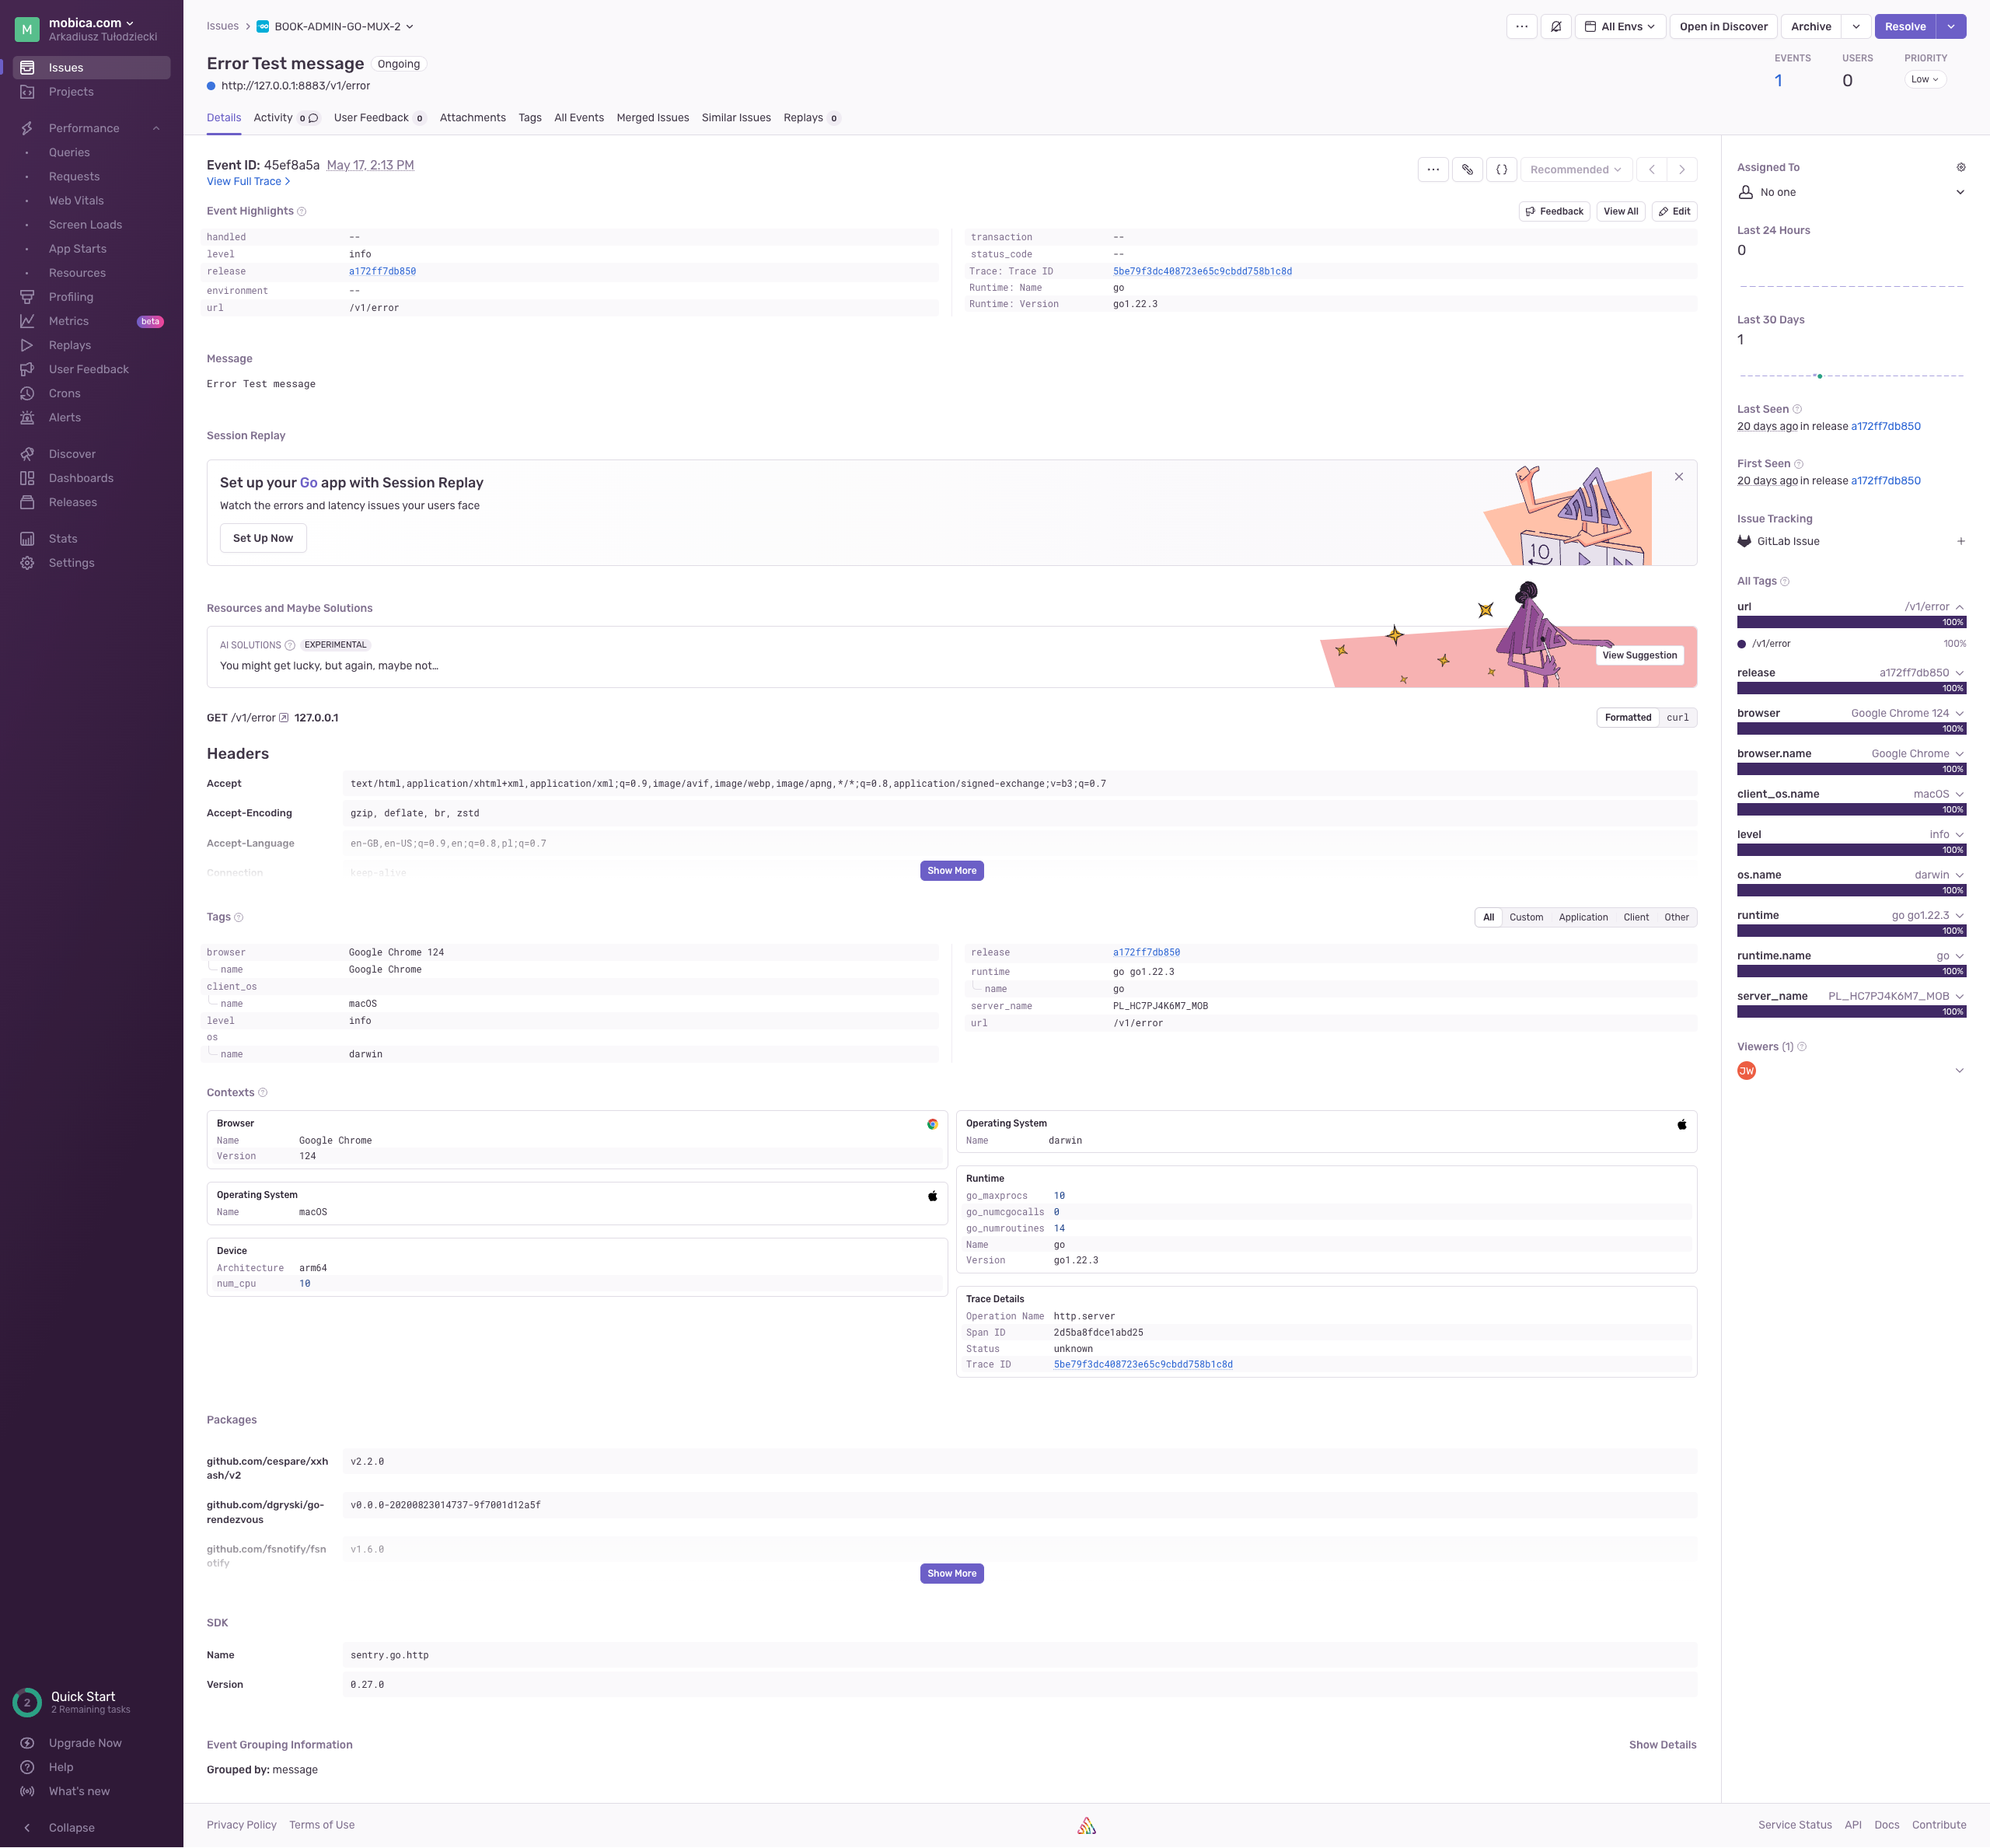
Our application can send messages to the Sentry and this message looks like this:
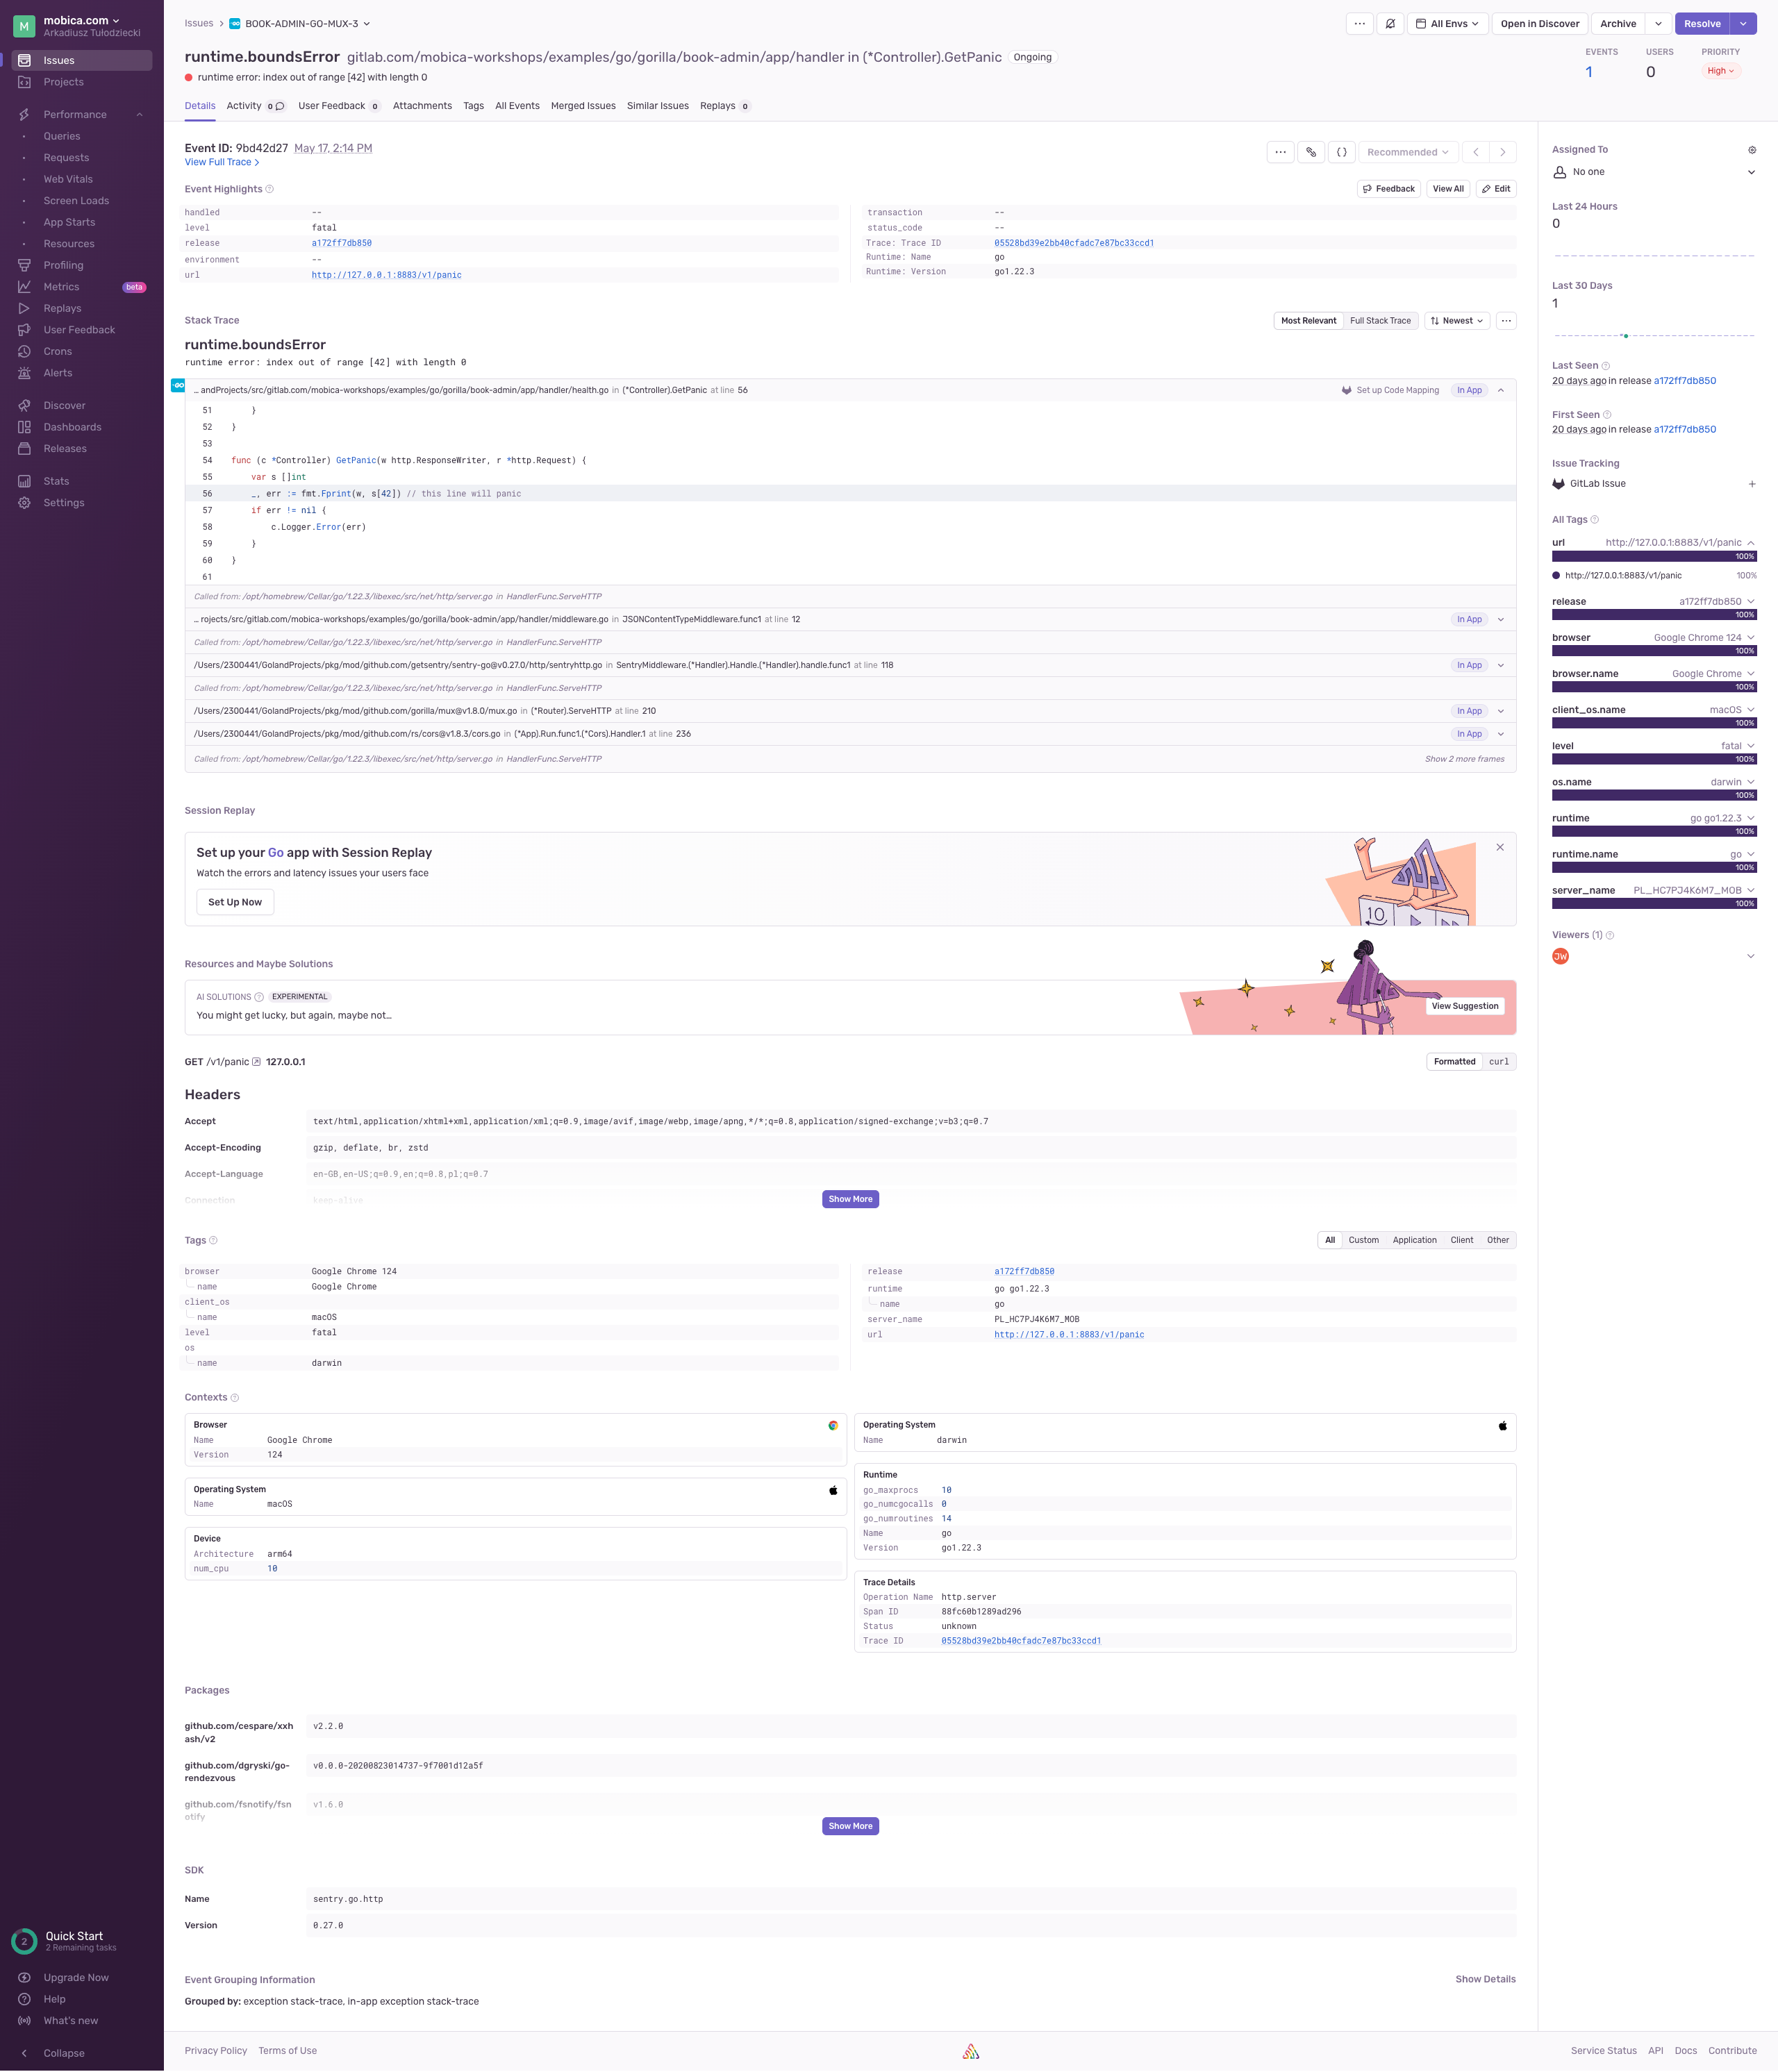
But the most important part of Sentry is error caching and we can see example bellow. Please focus on the trace section:
Application Security
There is many ways to secure our applications. In case of the services based on the containers - mostly used by Micro-service architecture - one of the most common and easy to achieve ways is container scanning.
Generating a vulnerability scan for your containerized applications as part of your DevSecOps process is an essential technique to help secure your software supply chain. Vulnerability scans are critical due to the growing prominence of supply chain attacks such as Solarwinds, maintainers intentionally adding malware like node-ipc, and critical vulnerabilities like Log4Shell.
Scanners like Trivy and Grype which we present to you during this workshop are part of Static application security testing (SAST) technique. It is highly recommended to add this part of security practice to your projects as fast as possible.
There are also scanners related to Dynamic application security testing (DAST). We are not focusing on those scanners during this workshop because most of the scanners are not free to use and those which are in most of the cases are too complex to set up.
| If you have any suggestion which will made this statement not true - please contact us, and we will gladly extend this workshop with examples for them. |
Security is also connected to licenses of libraries and other applications used by our application. To achieve this we need a tool which will generate Software Bill of Materials (SBOM) report. In our workshop we will use a free tool for this called Syft. Syft is not ideal and generates SBOM but in the many cases license part is missing because its database is very small and we will need to check those missing parts ourselves.
Local Environment
Now let’s start practical part of this workshop.
| In case there will be any problems with workshop instructions, and you will find yourself blocked somehow - than feel free to create issues ticket by using this link: https://gitlab.com/devops-training-info/documentation/microservices-backend-local-development-guide/-/work_items and using button: New item. If you are on live workshop just ask a question. |
K3s, Helm, and buildx preparations
K3s
To test if our service is ready for the deployment to the Kubernetes cluster we will use our local K3s installation.
Please use this command to create our K3s cluster:
k3d cluster create bookCluster --api-port 6443 --servers 1 --agents 3 -p "30700-30799:30700-30799@server:0"You should have similar output to this one:
INFO[0000] Prep: Network
INFO[0000] Created network 'k3d-bookCluster'
INFO[0000] Created image volume k3d-bookCluster-images
INFO[0000] Starting new tools node...
INFO[0000] Pulling image 'ghcr.io/k3d-io/k3d-tools:5.8.3'
INFO[0001] Creating node 'k3d-bookCluster-server-0'
INFO[0002] Starting node 'k3d-bookCluster-tools'
INFO[0002] Pulling image 'docker.io/rancher/k3s:v1.31.5-k3s1'
INFO[0004] Creating node 'k3d-bookCluster-agent-0'
INFO[0004] Creating node 'k3d-bookCluster-agent-1'
INFO[0004] Creating node 'k3d-bookCluster-agent-2'
INFO[0004] Creating LoadBalancer 'k3d-bookCluster-serverlb'
INFO[0006] Pulling image 'ghcr.io/k3d-io/k3d-proxy:5.8.3'
INFO[0009] Using the k3d-tools node to gather environment information
INFO[0009] HostIP: using network gateway 192.168.96.1 address
INFO[0009] Starting cluster 'bookCluster'
INFO[0009] Starting servers...
INFO[0009] Starting node 'k3d-bookCluster-server-0'
INFO[0011] Starting agents...
INFO[0011] Starting node 'k3d-bookCluster-agent-1'
INFO[0011] Starting node 'k3d-bookCluster-agent-2'
INFO[0011] Starting node 'k3d-bookCluster-agent-0'
INFO[0020] Starting helpers...
INFO[0020] Starting node 'k3d-bookCluster-serverlb'
INFO[0027] Injecting records for hostAliases (incl. host.k3d.internal) and for 5 network members into CoreDNS configmap...
INFO[0029] Cluster 'bookCluster' created successfully!
INFO[0029] You can now use it like this:
kubectl cluster-info
Then you can check it with this command:
kubectl cluster-infoAnd you will have similar output to this:
Kubernetes control plane is running at https://0.0.0.0:6443
CoreDNS is running at https://0.0.0.0:6443/api/v1/namespaces/kube-system/services/kube-dns:dns/proxy
Metrics-server is running at https://0.0.0.0:6443/api/v1/namespaces/kube-system/services/https:metrics-server:https/proxy

To further debug and diagnose cluster problems, use 'kubectl cluster-info dump'.
let’s analise our creation command a little and our cluster itself. But before it to better understand it let start with some definitions:
A server node is defined as a host running the k3s server command, with control-plane and datastore components managed by K3s. An agent node is defined as a host running the k3s agent command, without any datastore or control-plane components. Both servers and agents run the kubelet, container runtime, and CNI.
Starting with command:
-
k3d cluster create bookCluster- this command will create cluster with the name bookCluster and other parameters given after it will just help to create it in a way we wanted it to be created -
--api-port 6443- we are letting know to serve API on the standard port with will be used by our Portainer installation later. You can see this withkubectl cluster-infocommand. -
--servers 1- we are creating one server node -
--agents 3- we are creating three agent nodes -
-p "30700-30799:30700-30799@server:0"we are forwarding ports from 30700 to 30799 to the same set of ports in the server node. This is used by our NodePort setup later and Portainer we will install.
Let’s see our nodes in details:
kubectl get nodesWhich will have similar output to this:
NAME                       STATUS   ROLES                  AGE     VERSION
k3d-bookcluster-agent-0    Ready    <none>                 3m18s   v1.31.5+k3s1
k3d-bookcluster-agent-1    Ready    <none>                 3m18s   v1.31.5+k3s1
k3d-bookcluster-agent-2    Ready    <none>                 3m16s   v1.31.5+k3s1
k3d-bookcluster-server-0   Ready    control-plane,master   3m26s   v1.31.5+k3s1
Now let’s check how this look in docker:
docker psWhich will have similar output to this:
CONTAINER ID   IMAGE                            COMMAND                  CREATED         STATUS                  PORTS                                                                                                     NAMES
ac51320054ee   ghcr.io/k3d-io/k3d-proxy:5.8.3   "/bin/sh -c nginx-pr…"   4 minutes ago   Up 4 minutes            0.0.0.0:6443->6443/tcp, 80/tcp, 0.0.0.0:30700-30799->30700-30799/tcp, [::]:30700-30799->30700-30799/tcp   k3d-bookCluster-serverlb
9e175c325957   rancher/k3s:v1.31.5-k3s1         "/bin/k3d-entrypoint…"   4 minutes ago   Up 4 minutes                                                                                                                      k3d-bookCluster-agent-2
5d7c8c7a75fd   rancher/k3s:v1.31.5-k3s1         "/bin/k3d-entrypoint…"   4 minutes ago   Up 4 minutes                                                                                                                      k3d-bookCluster-agent-1
458d2bd68ad9   rancher/k3s:v1.31.5-k3s1         "/bin/k3d-entrypoint…"   4 minutes ago   Up 4 minutes                                                                                                                      k3d-bookCluster-agent-0
6fd8951e88a8   rancher/k3s:v1.31.5-k3s1         "/bin/k3d-entrypoint…"   4 minutes ago   Up 4 minutes                                                                                                                      k3d-bookCluster-server-0
Like you can see we have also special LB node k3d-bookCluster-serverlb.
|
You can always stop this cluster to save resources with: And start it again with: Because you can have multiple clusters you can always change to this one with command like this: or by using |
Please create services namespace we will be using during this workshop:
kubectl create namespace servicesWhich will have output like this:
namespace/services createdHelm
We also need to have our helm repository registered if we didn’t do this already:
helm repo add book-service https://gitlab.com/api/v4/projects/81999726/packages/helm/stableWhich will have output like this:
"book-service" has been added to your repositoriesCheck which GitLab Runner versions you have access to:
helm search repo -l book-service/book-serviceIf you can’t access the latest versions of book-service/book-service, update the chart with this command:
helm repo update book-serviceLater in the workshop we will be using deployment script: scripts/deploy-k3s.sh which looks like this for book-list
service.
#!/usr/bin/env bash
set -e
kubectx k3d-bookCluster (1)
./build-multi-stage-container.sh (2)
docker pull postgres:14-alpine
k3d image import -c bookCluster book-list:latest (3)
k3d image import -c bookCluster postgres:14-alpine
helm upgrade -i -f secrets/k3s-values.yaml --namespace=services k3s-book-list book-service/book-service --version 0.7.0 --dry-run --debug (4)
helm upgrade -i -f secrets/k3s-values.yaml --namespace=services k3s-book-list book-service/book-service --version 0.7.0 --wait (5)| 1 | We are switching to our local k3d-bookCluster which you need to install prior to this check |
| 2 | We need to build our service image we plan to deploy |
| 3 | We need to import this service image to the cluster |
| 4 | In this line we are showing how to use --dry-run and --debug - you need to choose if this line will be run or add # in the start to not use it |
| 5 | In this line we are deploying for real to our cluster - you need to choose if this line will be run or add # in the start to not use it |
Docker buildx
Check if BuildX is prepared for multi-arch build
docker buildx lsIn my case builder was not supporting multi-arch builds:
NAME/NODE     DRIVER/ENDPOINT   STATUS    BUILDKIT   PLATFORMS
default*      docker
\_ default    \_ default       running   v0.21.0    linux/amd64 (+4), linux/386
When your configuration is not supporting multi-arch just add it:
docker buildx create --name multiarch --driver docker-container --useAnd check again
|
This configuration is not enough as you will have this message when build multi-platform images with it: We plan to show how to use buildah with Gitlab CI in the future to achieve multiplatform images in a more easy way. |
Book List API
| In case there will be any problems with this service code please create issues ticket by using this link: https://gitlab.com/devops-training-info/examples/go/gorilla-web-toolkit/book-list/-/work_items and using button: New item. If you are on live workshop just ask a question. |
This project needs to be cloned into "$GOPATH/src/gitlab.com/devops-training-info/examples/go/gorilla-web-toolkit" folder. You will find two methods of cloning this project here.
You will need now to configure your local environment. For this please just use prepared shell script
./scripts/local-configure.sh which look like this:
#!/usr/bin/env bash
set -e
rm -Rf ansible/roles/secrets.*
ansible-galaxy install -r ansible/requirements.yml -p ansible/roles
ansible-playbook --vault-id @prompt -i 'localhost,' --connection=local ansible/local-playbook.yml
as you can see based on upper shell script ansible will ask you for a password.
./scripts/local-configure.sh
You can find it in each project README.md file
where it SHOULD NOT BE !!! and here. This password is: ThisIsExamplePassword4U
|
Vault password (default):Next system will ask you for docker tags you like to use for the target environments. You can just press enter in the both cases if you do not plan or can deploy to those environments from your laptop.
Version to deploy [latest]:This just show you way to work if you like to play with deploying from your local environment but normally this is done with the CI/CD pipeline.
When script will end working you should see something like this:
PLAY RECAP ************************************************************************************************************************************************************************************************
localhost                  : ok=28   changed=0    unreachable=0    failed=0    skipped=20   rescued=0    ignored=0
and in the secrets folder you should have all configuration files you need.
This service have more detailed documentation which needs to be build. To do this you need to start ./scripts/build-doc.sh script:
./scripts/build-doc.shThis script is using Ruby and asciidoctor to generate project documentation. Your output will be looking like this:
Successfully installed webrick-1.9.2
Parsing documentation for webrick-1.9.2
Done installing documentation for webrick after 0 seconds
1 gem installed
Successfully installed bundler-4.0.11
Parsing documentation for bundler-4.0.11
Done installing documentation for bundler after 0 seconds
1 gem installed
In a future version of Bundler, running `bundle` without argument will no longer run `bundle install`.
Instead, the `cli_help` command will be displayed. Please use `bundle install` explicitly for scripts like CI/CD.
You can use the future behavior now with `bundle config set default_cli_command cli_help --global`,
or you can continue to use the current behavior with `bundle config set default_cli_command install --global`.
This message will be removed after a default_cli_command value is set.

...

Bundle complete! 6 Gemfile dependencies, 25 gems now installed.
Bundled gems are installed into `./.bundle/gems`
1 installed gem you directly depend on is looking for funding.
  Run `bundle fund` for details
If this success you can see this documentation in your browser with a help of ./scripts/serve-doc.sh script:
./scripts/serve-doc.shwhich should give you this kind of output:
[2026-05-11 16:48:55] INFO  WEBrick 1.9.2
[2026-05-11 16:48:55] INFO  ruby 4.0.3 (2026-04-21) [x86_64-linux]
[2026-05-11 16:48:55] INFO  WEBrick::HTTPServer#start: pid=160363 port=8880
[2026-05-11 16:48:55] INFO  To access this server, open this URL in a browser:
[2026-05-11 16:48:55] INFO      http://127.0.0.1:8880
[2026-05-11 16:48:55] INFO      http://[::1]:8880
Just visit this link in the browser.
This is mostly useful when you are working on documentation itself as this documentation should be available in the
Gitlab Pages for the project or by example Confluence and just should be generated by the CI and link to it should be located in the project README.md file.
Service Development and Continuous Integration
To show how normal development flow will look please start with creating service our api is using. To achieve this you can just run docker-compose like this:
docker-compose -f compose-local.yml up -dyou should have this type of output in the end:
[+] up 4/4
 ✔ Network book-list_book-list          Created                                                                                                                                                                                   0.0s
 ✔ Container book-list-book-list-db-1   Started                                                                                                                                                                                   0.2s
 ✔ Container book-list-swagger-ui-1     Started                                                                                                                                                                                   0.2s
 ✔ Container book-list-swagger-editor-1 Started
If there will be no problems you should have PostgreSQL available on localhost:5432,
Swagger Editor on localhost:19000, and Swagger UI available on localhost:19010.
You can check if this service is passing created tests by running script scripts/local-test.sh:
./scripts/local-test.shTo run this application first you need to build it using scripts/build.sh script:
./scripts/build.shand after successful build run it with scripts/serve.sh script:
./scripts/serve.shYour output should look similar to this:
2026/05/11 18:54:12 INFO trying to load config file
2026/05/11 18:54:12 INFO config file loaded path=./secrets/local.env.yaml
{"time":"2026-05-11T18:54:12.41607072+02:00","level":"INFO","msg":"start connecting to database","host":"localhost","port":"5432"}
{"time":"2026-05-11T18:54:12.416928771+02:00","level":"INFO","msg":"TCP connection to the database possible","host":"localhost","port":"5432"}
{"time":"2026-05-11T18:54:12.426067724+02:00","level":"INFO","msg":"connected to database!"}
{"time":"2026-05-11T18:54:12.428618674+02:00","level":"INFO","msg":"Dropping all tables completed"}
{"time":"2026-05-11T18:54:12.43417892+02:00","level":"INFO","msg":"migration completed"}
{"time":"2026-05-11T18:54:12.438171348+02:00","level":"INFO","msg":"loading test data completed: 4 records"}
{"time":"2026-05-11T18:54:12.438509434+02:00","level":"INFO","msg":"server is running","url":"http://127.0.0.1:8882"}
Next what we can do is to visit Swagger UI in your browser and check if service is working properly.
To simulate development process just change message text in this file ./app/handler/health.go, stop serving, build,
and start serving again.
When you will finish your work please stop your serving application with Ctrl+C.
Please also turn off all containers when you will finish this section with command:
docker-compose -f compose-local.yml downContinuous Delivery and end-to-end testing
To be sure that our application is deliverable we need to check if docker containers we will end with are correct and will build with success in the CI.
Because in many cases we like to have testing, packaging service and building docker containers in separate jobs in the CI
it is highly possible that we will be using single stage docker files. To be sure that in this example we will end with
usable for them binaries to test this please run build-linux.sh script:
./scripts/build.sh linuxThis script will prepare binary version of our service for linux used in the container and for the architecture we are using in this container.
Now just run build-single-stage-container.sh script:
./scripts/build-single-stage-container.shto check if prepared Dockerfile single-stage.Dockerfile works correctly.
In other cases we will have multi-stage Dockerfile multi-stage.Dockerfile. Those files have multiple stages
and only last stage is something what will end as the docker image. Stages before it are to prepare all required files
for the last stage to ends with as minimal image as possible. In our example first stage is building binary of our
service.
 1
 2
 3
 4
 5
 6
 7
 8
 9
10
11
12
FROM golang:latest AS builder (1)
WORKDIR /go/src/gitlab.com/devops-training-info/examples/go/gorilla-web-toolkit/book-list
ADD . ./
RUN ./scripts/build.sh linux (2)

FROM alpine:latest (3)
RUN mkdir -p "/var/application"
COPY internal/web/static /var/application/public
COPY --from=builder /go/src/gitlab.com/devops-training-info/examples/go/gorilla-web-toolkit/book-list/book-list /bin/book-list (4)
EXPOSE 8080
ENTRYPOINT ["/bin/book-list"]
CMD ["serve", "--config", "/secrets/local.env.yaml", "-b", "0.0.0.0", "-p", "8080", "-m"]
| 1 | Starting first stage we are naming here builder by taking as a source golang:latest image @1 |
| 2 | We are building binary of our application using our prepare script |
| 3 | Now we are starting our final stage, and we are using very small image alpine:latest |
| 4 | We are copying our generated in the build stage binary to this one |
Our local environment which we will be using for end-to-end testing is based on this docker image and docker-compose.
Please first build your image using this shell command:
docker-compose -f compose-test.yml buildNow you can start it:
docker-compose -f compose-test.yml upYou will have now environment very useful for developing end-to-end tests which will be used in the CI or just to do manual testing like in our case.
Now we can use Bruno CLI to check if our service works properly
./scripts/local-e2e.shour output should look similar to this:
up to date, audited 2 packages in 364ms

1 package is looking for funding
  run `npm fund` for details

found 0 vulnerabilities
v1/books/List Books (200 OK) - 6 ms
Assertions
   ✓ res.status: eq 200

...

v1/Get Health (200 OK) - 0 ms
Assertions
   ✓ res.status: eq 200
   ✓ res.body.status: eq 200
   ✓ res.body.message: eq "book-list api health"
   ✓ res.body.content.alive: eq true
   ✓ res.body.content.postgres: eq true

Requests:    10 passed, 10 total
Tests:       0 passed, 0 total
Assertions:  102 passed, 102 total
Ran all requests - 20 ms

Requests:    10 passed, 10 total
Tests:       0 passed, 0 total
Assertions:  102 passed, 102 total
Wrote json results to ../../results.json
When you will finish please remember to stop your containers with Ctrl+C.
Continuous Security Testing
You can check if this service is passing security tests by running script local-scan.sh:
./scripts/local-scan.shYour output should look similar to this:
[+] Building 7.7s (14/14) FINISHED                                                                                                                                                                                     docker:default
 => [internal] load build definition from multi-stage.Dockerfile                                                                                                                                                                 0.0s
 => => transferring dockerfile: 569B                                                                                                                                                                                             0.0s
 => [internal] load metadata for docker.io/library/golang:latest                                                                                                                                                                 0.5s
 => [internal] load metadata for docker.io/library/alpine:latest                                                                                                                                                                 0.5s
 => [internal] load .dockerignore                                                                                                                                                                                                0.0s
 => => transferring context: 357B                                                                                                                                                                                                0.0s
 => [builder 1/4] FROM docker.io/library/golang:latest@sha256:2981696eed011d747340d7252620932677929cce7d2d539602f56a8d7e9b660b                                                                                                   0.0s
 => [internal] load build context                                                                                                                                                                                                0.3s
 => => transferring context: 11.45MB                                                                                                                                                                                             0.3s
 => [stage-1 1/4] FROM docker.io/library/alpine:latest@sha256:5b10f432ef3da1b8d4c7eb6c487f2f5a8f096bc91145e68878dd4a5019afde11                                                                                                   0.0s
 => CACHED [builder 2/4] WORKDIR /go/src/gitlab.com/devops-training-info/examples/go/gorilla-web-toolkit/book-list                                                                                                               0.0s
 => [builder 3/4] ADD . ./                                                                                                                                                                                                       0.3s
 => [builder 4/4] RUN ./scripts/build.sh linux                                                                                                                                                                                   6.4s
 => CACHED [stage-1 2/4] RUN mkdir -p "/var/application"                                                                                                                                                                         0.0s
 => CACHED [stage-1 3/4] COPY internal/web/static /var/application/public                                                                                                                                                        0.0s
 => CACHED [stage-1 4/4] COPY --from=builder /go/src/gitlab.com/devops-training-info/examples/go/gorilla-web-toolkit/book-list/book-list /bin/book-list                                                                          0.0s
 => exporting to image                                                                                                                                                                                                           0.0s
 => => exporting layers                                                                                                                                                                                                          0.0s
 => => writing image sha256:c42c0a5a034e847014a35b104eb2f411a64e430542400ad172f4615a9e6718c5                                                                                                                                     0.0s
 => => naming to docker.io/library/book-list:latest                                                                                                                                                                              0.0s
Version: 0.70.0
...
Report Summary

┌──────────────────────────────────┬──────────┬─────────────────┬─────────┐
│              Target              │   Type   │ Vulnerabilities │ Secrets │
├──────────────────────────────────┼──────────┼─────────────────┼─────────┤
│ book-list:latest (alpine 3.23.4) │  alpine  │        0        │    -    │
├──────────────────────────────────┼──────────┼─────────────────┼─────────┤
│ bin/book-list                    │ gobinary │        3        │    -    │
└──────────────────────────────────┴──────────┴─────────────────┴─────────┘
Legend:
- '-': Not scanned
- '0': Clean (no security findings detected)


bin/book-list (gobinary)

Total: 3 (MEDIUM: 2, HIGH: 0, CRITICAL: 1)

┌─────────────────────────┬────────────────┬──────────┬────────┬───────────────────┬───────────────┬──────────────────────────────────────────────────────────────┐
│         Library         │ Vulnerability  │ Severity │ Status │ Installed Version │ Fixed Version │                            Title                             │
├─────────────────────────┼────────────────┼──────────┼────────┼───────────────────┼───────────────┼──────────────────────────────────────────────────────────────┤
│ github.com/jackc/pgx/v5 │ CVE-2026-33816 │ CRITICAL │ fixed  │ v5.7.6            │ 5.9.0         │ github.com/jackc/pgx/v5: github.com/jackc/pgx: Memory-safety │
│                         │                │          │        │                   │               │ vulnerability                                                │
│                         │                │          │        │                   │               │ https://avd.aquasec.com/nvd/cve-2026-33816                   │
├─────────────────────────┼────────────────┼──────────┤        ├───────────────────┼───────────────┼──────────────────────────────────────────────────────────────┤
│ golang.org/x/crypto     │ CVE-2025-47914 │ MEDIUM   │        │ v0.42.0           │ 0.45.0        │ golang.org/x/crypto/ssh/agent: SSH Agent servers: Denial of  │
│                         │                │          │        │                   │               │ Service due to malformed messages                            │
│                         │                │          │        │                   │               │ https://avd.aquasec.com/nvd/cve-2025-47914                   │
│                         ├────────────────┤          │        │                   │               ├──────────────────────────────────────────────────────────────┤
│                         │ CVE-2025-58181 │          │        │                   │               │ golang.org/x/crypto/ssh: golang.org/x/crypto/ssh: Denial of  │
│                         │                │          │        │                   │               │ Service via unbounded memory consumption in GSSAPI           │
│                         │                │          │        │                   │               │ authentication...                                            │
│                         │                │          │        │                   │               │ https://avd.aquasec.com/nvd/cve-2025-58181                   │
└─────────────────────────┴────────────────┴──────────┴────────┴───────────────────┴───────────────┴──────────────────────────────────────────────────────────────┘
In my case there are issues to be fixed ;) Now please try to scan in a similar way using grype tool instead of trivy.
Compare results and think why we can have different results using different scanning tools.
To generate SBOM report for our applications we need to use prepared script scripts/local-sbom.sh.
|
Please run it:
./scripts/local-sbom.shIn the end you should see new file: syft-sbom.json. Please review it.
Continuous Deployment Testing
Just run our deployment script deploy-k3s.sh:
./scripts/deploy-k3s.shDepends on what you will choose - or you will see what will be sent to the cluster, or you will do a deployment, or both.
If you decided to deploy your application you can check how the deployment goes with the help of k9s tool:
k9s -n servicesExtra: Multiplatform
You can check how our multiplatform container build example work by running script scripts/multiplatform.build-multi-stage-container.sh:
./scripts/multiplatform.build-multi-stage-container.shYour output should look similar to this:
[+] Building 0.9s (21/21) FINISHED docker-container:multiplatform-builder
=> [internal] load build definition from multiplatform.multi-stage.Dockerfile 0.0s
=> => transferring dockerfile: 887B 0.0s
=> [linux/amd64 internal] load metadata for docker.io/library/alpine:latest 0.5s
=> [linux/arm64 internal] load metadata for docker.io/library/alpine:latest 0.5s
=> [linux/arm64 internal] load metadata for docker.io/library/golang:1.22-alpine 0.4s
=> [internal] load .dockerignore 0.0s
=> => transferring context: 349B 0.0s
=> [internal] load build context 0.3s
=> => transferring context: 424.42kB 0.3s
=> [linux/arm64 builder 1/6] FROM docker.io/library/golang:1.22-alpine@sha256:9bdd5692d39acc3f8d0ea6f81327f87ac6b473dd29a2b6006df362bff48dd1f8 0.0s
=> => resolve docker.io/library/golang:1.22-alpine@sha256:9bdd5692d39acc3f8d0ea6f81327f87ac6b473dd29a2b6006df362bff48dd1f8 0.0s
=> [linux/amd64 stage-1 1/4] FROM docker.io/library/alpine:latest@sha256:77726ef6b57ddf65bb551896826ec38bc3e53f75cdde31354fbffb4f25238ebd 0.0s
=> => resolve docker.io/library/alpine:latest@sha256:77726ef6b57ddf65bb551896826ec38bc3e53f75cdde31354fbffb4f25238ebd 0.0s
=> [linux/arm64 stage-1 1/4] FROM docker.io/library/alpine:latest@sha256:77726ef6b57ddf65bb551896826ec38bc3e53f75cdde31354fbffb4f25238ebd 0.0s
=> => resolve docker.io/library/alpine:latest@sha256:77726ef6b57ddf65bb551896826ec38bc3e53f75cdde31354fbffb4f25238ebd 0.0s
=> CACHED [linux/amd64 stage-1 2/4] RUN mkdir -p "/var/application" 0.0s
=> CACHED [linux/amd64 stage-1 3/4] COPY public /var/application/public 0.0s
=> CACHED [linux/arm64 builder 2/6] WORKDIR /go/src/gitlab.com/mobica-workshops/examples/go/gorilla/book-list 0.0s
=> CACHED [linux/arm64 builder 3/6] COPY go.mod go.sum ./ 0.0s
=> CACHED [linux/arm64 builder 4/6] RUN go mod download 0.0s
=> CACHED [linux/arm64 builder 5/6] ADD . ./ 0.0s
=> CACHED [linux/arm64->amd64 builder 6/6] RUN --mount=target=.:rw --mount=type=cache,target=/root/.cache/go-build --mount=type=cache,target=/go/pkg GOOS=linux GOARCH=amd64 go build -o book-list . 0.0s
=> CACHED [linux/amd64 stage-1 4/4] COPY --from=builder /go/src/gitlab.com/mobica-workshops/examples/go/gorilla/book-list/book-list /bin/book-list 0.0s
=> CACHED [linux/arm64 stage-1 2/4] RUN mkdir -p "/var/application" 0.0s
=> CACHED [linux/arm64 stage-1 3/4] COPY public /var/application/public 0.0s
=> CACHED [linux/arm64 builder 6/6] RUN --mount=target=.:rw --mount=type=cache,target=/root/.cache/go-build --mount=type=cache,target=/go/pkg GOOS=linux GOARCH=arm64 go build -o book-list . 0.0s
=> CACHED [linux/arm64 stage-1 4/4] COPY --from=builder /go/src/gitlab.com/mobica-workshops/examples/go/gorilla/book-list/book-list /bin/book-list 0.0s
WARNING: No output specified with docker-container driver. Build result will only remain in the build cache. To push result image into registry use --push or to load image into docker use --load|
To fix this issue: You need to add and information similar to this: |
Book Admin API
| In case there will be any problems with this service code please create issues ticket by using this link: https://gitlab.com/devops-training-info/examples/go/gorilla-web-toolkit/book-admin/-/work_items and using button: New item. If you are on live workshop just ask a question. |
This project needs to be cloned into "$GOPATH/src/gitlab.com/devops-training-info/examples/go/gorilla-web-toolkit" folder. You will find two methods of cloning this project here.
You will need now to configure your local environment. For this please just use prepared shell script
./scripts/local-configure.sh which look like this:
#!/usr/bin/env bash
set -e
rm -Rf ansible/roles/secrets.*
ansible-galaxy install -r ansible/requirements.yml -p ansible/roles
ansible-playbook --vault-id @prompt -i 'localhost,' --connection=local ansible/local-playbook.yml
as you can see based on upper shell script ansible will ask you for a password.
./scripts/local-configure.sh
You can find it in each project README.md file
where it SHOULD NOT BE !!! and here. This password is: ThisIsExamplePassword4U
|
Vault password (default):Next system will ask you for docker tags you like to use for the target environments. You can just press enter in the both cases if you do not plan or can deploy to those environments from your laptop.
Version to deploy [latest]:This just show you way to work if you like to play with deploying from your local environment but normally this is done with the CI/CD pipeline.
When script will end working you should see something like this:
PLAY RECAP ************************************************************************************************************************************************************************************************
localhost                  : ok=28   changed=0    unreachable=0    failed=0    skipped=20   rescued=0    ignored=0
and in the secrets folder you should have all configuration files you need.
This service have more detailed documentation which needs to be build. To do this you need to start ./scripts/build-doc.sh script:
./scripts/build-doc.shThis script is using Ruby and asciidoctor to generate project documentation. Your output will be looking like this:
Successfully installed webrick-1.9.2
Parsing documentation for webrick-1.9.2
Done installing documentation for webrick after 0 seconds
1 gem installed
Successfully installed bundler-4.0.11
Parsing documentation for bundler-4.0.11
Done installing documentation for bundler after 0 seconds
1 gem installed
In a future version of Bundler, running `bundle` without argument will no longer run `bundle install`.
Instead, the `cli_help` command will be displayed. Please use `bundle install` explicitly for scripts like CI/CD.
You can use the future behavior now with `bundle config set default_cli_command cli_help --global`,
or you can continue to use the current behavior with `bundle config set default_cli_command install --global`.
This message will be removed after a default_cli_command value is set.

...

Bundle complete! 6 Gemfile dependencies, 25 gems now installed.
Bundled gems are installed into `./.bundle/gems`
1 installed gem you directly depend on is looking for funding.
  Run `bundle fund` for details
If this success you can see this documentation in your browser with a help of ./scripts/serve-doc.sh script:
./scripts/serve-doc.shwhich should give you this kind of output:
[2026-05-11 16:48:55] INFO  WEBrick 1.9.2
[2026-05-11 16:48:55] INFO  ruby 4.0.3 (2026-04-21) [x86_64-linux]
[2026-05-11 16:48:55] INFO  WEBrick::HTTPServer#start: pid=160363 port=8880
[2026-05-11 16:48:55] INFO  To access this server, open this URL in a browser:
[2026-05-11 16:48:55] INFO      http://127.0.0.1:8880
[2026-05-11 16:48:55] INFO      http://[::1]:8880
Just visit this link in the browser.
This is mostly useful when you are working on documentation itself as this documentation should be available in the
Gitlab Pages for the project or by example Confluence and just should be generated by the CI and link to it should be located in the project README.md file.
Service Development and Continuous Integration
To show how normal development flow will look please start with creating service our api is using. To achieve this you can just run docker-compose like this:
docker-compose -f compose-local.yml up -dyou should have this type of output in the end:
[+] up 4/4
 ✔ Container book-admin-book-admin-mongo-express-1 Running                                                                                                                                                                        0.0s
 ✔ Container book-admin-swagger-ui-1               Started                                                                                                                                                                        0.2s
 ✔ Container book-admin-swagger-editor-1           Started                                                                                                                                                                        0.1s
 ✔ Container book-admin-book-admin-db-1            Started
If there will be no problems you should have MongoDB available on localhost:27017,
Swagger Editor on localhost:19000, and Swagger UI available on localhost:19010.
You can check if this service is passing created tests by running script scripts/local-test.sh:
./scripts/local-test.shTo run this application first you need to build it using scripts/build.sh script:
./scripts/build.shand after successful build run it with scripts/serve.sh script:
./scripts/serve.shYour output should look similar to this:
2026/05/11 19:24:42 INFO trying to load config file
2026/05/11 19:24:42 INFO config file loaded path=./secrets/local.env.yaml
{"time":"2026-05-11T19:24:42.166556517+02:00","level":"DEBUG","msg":"collection: admins - dropped"}
{"time":"2026-05-11T19:24:42.166571595+02:00","level":"INFO","msg":"Dropping all collections completed"}
{"time":"2026-05-11T19:24:42.861443296+02:00","level":"DEBUG","msg":"admin: atulodzi@gmail.com inserted with ID: 6a0202caae8a44efca374028"}
{"time":"2026-05-11T19:24:42.861455289+02:00","level":"INFO","msg":"Loading test data completed"}
{"time":"2026-05-11T19:24:42.873092824+02:00","level":"DEBUG","msg":"unique index: email_1 created in the collection: admin"}
{"time":"2026-05-11T19:24:42.873105418+02:00","level":"INFO","msg":"Migration completed"}
{"time":"2026-05-11T19:24:42.873208625+02:00","level":"INFO","msg":"server is running","url":"http://127.0.0.1:8883"}
Next what we can do is to visit Swagger UI in your browser and check if service is working properly.
To simulate development process just change message text in this file ./app/handler/health.go, stop serving, build,
and start serving again.
When you will finish your work please stop your serving application with Ctrl+C.
Please also turn off all containers when you will finish this section with command:
docker-compose -f compose-local.yml downContinuous Delivery and end-to-end testing
To be sure that our application is deliverable we need to check if docker containers we will end with are correct and will build with success in the CI.
Because in many cases we like to have testing, packaging service and building docker containers in separate jobs in the CI
it is highly possible that we will be using single stage docker files. To be sure that in this example we will end with
usable for them binaries to test this please run build-linux.sh script:
./scripts/build.sh linuxThis script will prepare binary version of our service for linux used in the container and for the architecture we are using in this container.
Now just run build-single-stage-container.sh script:
./scripts/build-single-stage-container.shto check if prepared Dockerfile single-stage.Dockerfile works correctly.
In other cases we will have multi-stage Dockerfile multi-stage.Dockerfile. Those files have multiple stages
and only last stage is something what will end as the docker image. Stages before it are to prepare all required files
for the last stage to ends with as minimal image as possible. In our example first stage is building binary of our
service.
 1
 2
 3
 4
 5
 6
 7
 8
 9
10
11
12
FROM golang:latest AS builder (1)
WORKDIR /go/src/gitlab.com/devops-training-info/examples/go/gorilla-web-toolkit/book-admin
ADD . ./
RUN ./scripts/build.sh linux (2)

FROM alpine:latest (3)
RUN mkdir -p "/var/application"
COPY internal/web/static /var/application/public
COPY --from=builder /go/src/gitlab.com/devops-training-info/examples/go/gorilla-web-toolkit/book-admin/book-admin /bin/book-admin (4)
EXPOSE 8080
ENTRYPOINT ["/bin/book-admin"]
CMD ["serve", "--config", "/secrets/local.env.yaml", "-b", "0.0.0.0", "-p", "8080", "-m"]
| 1 | Starting first stage we are naming here builder by taking as a source golang:latest image @1 |
| 2 | We are building binary of our application using our prepare script |
| 3 | Now we are starting our final stage, and we are using very small image alpine:latest |
| 4 | We are copying our generated in the build stage binary to this one |
Our local environment which we will be using for end-to-end testing is based on this docker image and docker-compose.
Please first build your image using this shell command:
docker-compose -f compose-test.yml buildNow you can start it:
docker-compose -f compose-test.yml upYou will have now environment very useful for developing end-to-end tests which will be used in the CI or just to do manual testing like in our case.
Now we can use Bruno CLI to check if our service works properly
./scripts/local-e2e.shour output should look similar to this:
up to date, audited 2 packages in 364ms

1 package is looking for funding
  run `npm fund` for details

found 0 vulnerabilities
v1/books/List Books (200 OK) - 6 ms
Assertions
   ✓ res.status: eq 200

...

v1/Get Health (200 OK) - 0 ms
Assertions
   ✓ res.status: eq 200
   ✓ res.body.status: eq 200
   ✓ res.body.message: eq "book-list api health"
   ✓ res.body.content.alive: eq true
   ✓ res.body.content.postgres: eq true

Requests:    10 passed, 10 total
Tests:       0 passed, 0 total
Assertions:  102 passed, 102 total
Ran all requests - 20 ms

Requests:    10 passed, 10 total
Tests:       0 passed, 0 total
Assertions:  102 passed, 102 total
Wrote json results to ../../results.json
When you will finish please remember to stop your containers with Ctrl+C.
Continuous Security Testing
You can check if this service is passing security tests by running script local-scan.sh:
./scripts/local-scan.shYour output should look similar to this:
[+] Building 10.2s (14/14) FINISHED                                                                                                                                                                                    docker:default
 => [internal] load build definition from multi-stage.Dockerfile                                                                                                                                                                 0.0s
 => => transferring dockerfile: 574B                                                                                                                                                                                             0.0s
 => [internal] load metadata for docker.io/library/alpine:latest                                                                                                                                                                 0.5s
 => [internal] load metadata for docker.io/library/golang:latest                                                                                                                                                                 0.8s
 => [internal] load .dockerignore                                                                                                                                                                                                0.0s
 => => transferring context: 340B                                                                                                                                                                                                0.0s
 => CACHED [builder 1/4] FROM docker.io/library/golang:latest@sha256:2981696eed011d747340d7252620932677929cce7d2d539602f56a8d7e9b660b                                                                                            0.0s
 => [stage-1 1/4] FROM docker.io/library/alpine:latest@sha256:5b10f432ef3da1b8d4c7eb6c487f2f5a8f096bc91145e68878dd4a5019afde11                                                                                                   0.0s
 => [internal] load build context                                                                                                                                                                                                0.4s
 => => transferring context: 37.76MB                                                                                                                                                                                             0.3s
 => [builder 2/4] WORKDIR /go/src/gitlab.com/devops-training-info/examples/go/gorilla-web-toolkit/book-admin                                                                                                                     0.0s
 => [builder 3/4] ADD . ./                                                                                                                                                                                                       0.3s
 => [builder 4/4] RUN ./scripts/build.sh linux                                                                                                                                                                                   8.5s
 => CACHED [stage-1 2/4] RUN mkdir -p "/var/application"                                                                                                                                                                         0.0s
 => CACHED [stage-1 3/4] COPY internal/web/static /var/application/public                                                                                                                                                        0.0s
 => [stage-1 4/4] COPY --from=builder /go/src/gitlab.com/devops-training-info/examples/go/gorilla-web-toolkit/book-admin/book-admin /bin/book-admin                                                                              0.0s
 => exporting to image                                                                                                                                                                                                           0.0s
 => => exporting layers                                                                                                                                                                                                          0.0s
 => => writing image sha256:e2fbc25efed201452d8797f1e01456b2866ab3d648f49451f135f78071e3e0ca                                                                                                                                     0.0s
 => => naming to docker.io/library/book-admin:latest                                                                                                                                                                             0.0s
Version: 0.70.0
...
Report Summary

┌───────────────────────────────────┬──────────┬─────────────────┬─────────┐
│              Target               │   Type   │ Vulnerabilities │ Secrets │
├───────────────────────────────────┼──────────┼─────────────────┼─────────┤
│ book-admin:latest (alpine 3.23.4) │  alpine  │        0        │    -    │
├───────────────────────────────────┼──────────┼─────────────────┼─────────┤
│ bin/book-admin                    │ gobinary │        2        │    -    │
└───────────────────────────────────┴──────────┴─────────────────┴─────────┘
Legend:
- '-': Not scanned
- '0': Clean (no security findings detected)


bin/book-admin (gobinary)

Total: 2 (MEDIUM: 2, HIGH: 0, CRITICAL: 0)

┌─────────────────────┬────────────────┬──────────┬────────┬───────────────────┬───────────────┬─────────────────────────────────────────────────────────────┐
│       Library       │ Vulnerability  │ Severity │ Status │ Installed Version │ Fixed Version │                            Title                            │
├─────────────────────┼────────────────┼──────────┼────────┼───────────────────┼───────────────┼─────────────────────────────────────────────────────────────┤
│ golang.org/x/crypto │ CVE-2025-47914 │ MEDIUM   │ fixed  │ v0.42.0           │ 0.45.0        │ golang.org/x/crypto/ssh/agent: SSH Agent servers: Denial of │
│                     │                │          │        │                   │               │ Service due to malformed messages                           │
│                     │                │          │        │                   │               │ https://avd.aquasec.com/nvd/cve-2025-47914                  │
│                     ├────────────────┤          │        │                   │               ├─────────────────────────────────────────────────────────────┤
│                     │ CVE-2025-58181 │          │        │                   │               │ golang.org/x/crypto/ssh: golang.org/x/crypto/ssh: Denial of │
│                     │                │          │        │                   │               │ Service via unbounded memory consumption in GSSAPI          │
│                     │                │          │        │                   │               │ authentication...                                           │
│                     │                │          │        │                   │               │ https://avd.aquasec.com/nvd/cve-2025-58181                  │
└─────────────────────┴────────────────┴──────────┴────────┴───────────────────┴───────────────┴─────────────────────────────────────────────────────────────┘
Now please try to scan in a similar way using grype tool instead of trivy.
Compare results and think why we can have different results using different scanning tools.
To generate SBOM report for our applications we need to use prepared script scripts/local-sbom.sh.
|
Please run it:
./scripts/local-sbom.shIn the end you should see new file: syft-sbom.json. Please review it.
Continuous Deployment Testing
To test if our service is ready for the deployment to the Kubernetes cluster we will use our local K3s installation.
|
I’m assuming that you already created cluster |
Let us check if everything is working just please use our deploy-k3s.sh:
./scripts/deploy-k3s.shDepends on what you will choose - or you will see what will be sent to the cluster, or you will do a deployment, or both.
If you decided to deploy your application you can check how the deployment goes with the help of k9s tool:
k9s -n servicesExtra: Multiplatform
You can check how our multiplatform container build example work by running script multiplatform.build-multi-stage-container.sh:
./scripts/multiplatform.build-multi-stage-container.shYour output should look similar to this:
[+] Building 1.0s (21/21) FINISHED docker-container:multiplatform-builder
=> [internal] load build definition from multiplatform.multi-stage.Dockerfile 0.0s
=> => transferring dockerfile: 893B 0.0s
=> [linux/amd64 internal] load metadata for docker.io/library/alpine:latest 0.4s
=> [linux/arm64 internal] load metadata for docker.io/library/alpine:latest 0.4s
=> [linux/arm64 internal] load metadata for docker.io/library/golang:1.22-alpine 0.4s
=> [internal] load .dockerignore 0.0s
=> => transferring context: 340B 0.0s
=> [linux/arm64 stage-1 1/4] FROM docker.io/library/alpine:latest@sha256:77726ef6b57ddf65bb551896826ec38bc3e53f75cdde31354fbffb4f25238ebd 0.0s
=> => resolve docker.io/library/alpine:latest@sha256:77726ef6b57ddf65bb551896826ec38bc3e53f75cdde31354fbffb4f25238ebd 0.0s
=> [internal] load build context 0.5s
=> => transferring context: 674.29kB 0.5s
=> [linux/amd64 stage-1 1/4] FROM docker.io/library/alpine:latest@sha256:77726ef6b57ddf65bb551896826ec38bc3e53f75cdde31354fbffb4f25238ebd 0.0s
=> => resolve docker.io/library/alpine:latest@sha256:77726ef6b57ddf65bb551896826ec38bc3e53f75cdde31354fbffb4f25238ebd 0.0s
=> [linux/arm64 builder 1/6] FROM docker.io/library/golang:1.22-alpine@sha256:9bdd5692d39acc3f8d0ea6f81327f87ac6b473dd29a2b6006df362bff48dd1f8 0.0s
=> => resolve docker.io/library/golang:1.22-alpine@sha256:9bdd5692d39acc3f8d0ea6f81327f87ac6b473dd29a2b6006df362bff48dd1f8 0.0s
=> CACHED [linux/arm64 stage-1 2/4] RUN mkdir -p "/var/application" 0.0s
=> CACHED [linux/arm64 stage-1 3/4] COPY public /var/application/public 0.0s
=> CACHED [linux/arm64 builder 2/6] WORKDIR /go/src/gitlab.com/mobica-workshops/examples/go/gorilla/book-admin 0.0s
=> CACHED [linux/arm64 builder 3/6] COPY go.mod go.sum ./ 0.0s
=> CACHED [linux/arm64 builder 4/6] RUN go mod download 0.0s
=> CACHED [linux/arm64 builder 5/6] ADD . ./ 0.0s
=> CACHED [linux/arm64 builder 6/6] RUN --mount=target=.:rw --mount=type=cache,target=/root/.cache/go-build --mount=type=cache,target=/go/pkg GOOS=linux GOARCH=arm64 go build -o book-admin . 0.0s
=> CACHED [linux/arm64 stage-1 4/4] COPY --from=builder /go/src/gitlab.com/mobica-workshops/examples/go/gorilla/book-admin/book-admin /bin/book-admin 0.0s
=> CACHED [linux/amd64 stage-1 2/4] RUN mkdir -p "/var/application" 0.0s
=> CACHED [linux/amd64 stage-1 3/4] COPY public /var/application/public 0.0s
=> CACHED [linux/arm64->amd64 builder 6/6] RUN --mount=target=.:rw --mount=type=cache,target=/root/.cache/go-build --mount=type=cache,target=/go/pkg GOOS=linux GOARCH=amd64 go build -o book-admin . 0.0s
=> CACHED [linux/amd64 stage-1 4/4] COPY --from=builder /go/src/gitlab.com/mobica-workshops/examples/go/gorilla/book-admin/book-admin /bin/book-admin 0.0s
WARNING: No output specified with docker-container driver. Build result will only remain in the build cache. To push result image into registry use --push or to load image into docker use --load|
To fix this issue: You need to add and information similar to this: |
Backend For Frontend
| In case there will be any problems with this service code please create issues ticket by using this link: https://gitlab.com/devops-training-info/examples/go/gorilla-web-toolkit/book-bff/-/work_items and using button: New item. If you are on live workshop just ask a question. |
This project needs to be cloned into "$GOPATH/src/gitlab.com/devops-training-info/examples/go/gorilla-web-toolkit" folder. You will find two methods of cloning this project here.
|
To sign in using swagger which is used in the next steps please use our test user: |
You will need now to configure your local environment. For this please just use prepared shell script
./scripts/local-configure.sh which look like this:
#!/usr/bin/env bash
set -e
rm -Rf ansible/roles/secrets.*
ansible-galaxy install -r ansible/requirements.yml -p ansible/roles
ansible-playbook --vault-id @prompt -i 'localhost,' --connection=local ansible/local-playbook.yml
as you can see based on upper shell script ansible will ask you for a password.
./scripts/local-configure.sh
You can find it in each project README.md file
where it SHOULD NOT BE !!! and here. This password is: ThisIsExamplePassword4U
|
Vault password (default):Next system will ask you for docker tags you like to use for the target environments. You can just press enter in the both cases if you do not plan or can deploy to those environments from your laptop.
Version to deploy [latest]:This just show you way to work if you like to play with deploying from your local environment but normally this is done with the CI/CD pipeline.
When script will end working you should see something like this:
PLAY RECAP ************************************************************************************************************************************************************************************************
localhost                  : ok=28   changed=0    unreachable=0    failed=0    skipped=20   rescued=0    ignored=0
and in the secrets folder you should have all configuration files you need.
This service have more detailed documentation which needs to be build. To do this you need to start ./scripts/build-doc.sh script:
./scripts/build-doc.shThis script is using Ruby and asciidoctor to generate project documentation. Your output will be looking like this:
Successfully installed webrick-1.9.2
Parsing documentation for webrick-1.9.2
Done installing documentation for webrick after 0 seconds
1 gem installed
Successfully installed bundler-4.0.11
Parsing documentation for bundler-4.0.11
Done installing documentation for bundler after 0 seconds
1 gem installed
In a future version of Bundler, running `bundle` without argument will no longer run `bundle install`.
Instead, the `cli_help` command will be displayed. Please use `bundle install` explicitly for scripts like CI/CD.
You can use the future behavior now with `bundle config set default_cli_command cli_help --global`,
or you can continue to use the current behavior with `bundle config set default_cli_command install --global`.
This message will be removed after a default_cli_command value is set.

...

Bundle complete! 6 Gemfile dependencies, 25 gems now installed.
Bundled gems are installed into `./.bundle/gems`
1 installed gem you directly depend on is looking for funding.
  Run `bundle fund` for details
If this success you can see this documentation in your browser with a help of ./scripts/serve-doc.sh script:
./scripts/serve-doc.shwhich should give you this kind of output:
[2026-05-11 16:48:55] INFO  WEBrick 1.9.2
[2026-05-11 16:48:55] INFO  ruby 4.0.3 (2026-04-21) [x86_64-linux]
[2026-05-11 16:48:55] INFO  WEBrick::HTTPServer#start: pid=160363 port=8880
[2026-05-11 16:48:55] INFO  To access this server, open this URL in a browser:
[2026-05-11 16:48:55] INFO      http://127.0.0.1:8880
[2026-05-11 16:48:55] INFO      http://[::1]:8880
Just visit this link in the browser.
This is mostly useful when you are working on documentation itself as this documentation should be available in the
Gitlab Pages for the project or by example Confluence and just should be generated by the CI and link to it should be located in the project README.md file.
Service Development and Continuous Integration
To show how normal development flow will look please start with creating service our api is using. To achieve this you can just run docker-compose like this:
docker-compose -f compose-local.yml up -dyou should have this type of output in the end:
[+] up 10/10
 ✔ Network book-bff_book-bff                     Created                                                                                                                                                                          0.0s
 ✔ Volume book-bff_book-admin-db-83-data         Created                                                                                                                                                                          0.0s
 ✔ Container book-bff-swagger-ui-1               Started                                                                                                                                                                          0.3s
 ✔ Container book-bff-swagger-editor-1           Started                                                                                                                                                                          0.3s
 ✔ Container book-bff-book-list-db-1             Started                                                                                                                                                                          0.3s
 ✔ Container book-bff-redis-1                    Started                                                                                                                                                                          0.3s
 ✔ Container book-bff-book-admin-db-1            Started                                                                                                                                                                          0.3s
 ✔ Container book-bff-book-admin-1               Started                                                                                                                                                                          0.2s
 ✔ Container book-bff-book-admin-mongo-express-1 Started                                                                                                                                                                          0.3s
 ✔ Container book-bff-book-list-1                Started
If there will be no problems you should have Book List API available on localhost:8882,
Book Admin API available on localhost:8883, databases on their ports,
Swagger Editor on localhost:19000, and Swagger UI available on localhost:19010.
You can check if this service is passing created tests by running script local-test.sh:
./scripts/local-test.shTo run this application first you need to build it using build.sh script:
./scripts/build.shand after successful build run it with serve.sh script:
./scripts/serve.shYour output should look similar to this:
2026/05/11 20:18:15 INFO Config file loaded path=/home/ldath/gitlab.com/devops-training-info/examples/go/gorilla-web-toolkit/book-bff/secrets/local.env.yaml
{"time":"2026-05-11T20:18:15.545914675+02:00","level":"INFO","msg":"redis configured","uri":"localhost:6379"}
{"time":"2026-05-11T20:18:15.546208556+02:00","level":"INFO","msg":"server is running","url":"http://127.0.0.1:8881"}
Next what we can do is to visit Swagger UI in your browser and check if service is working properly.
To simulate development process just change message text in this file ./app/handler/health.go, stop serving, build,
and start serving again.
When you will finish your work please stop your serving application with Ctrl+C.
Please also turn off all containers when you will finish this section with command:
docker-compose -f compose-local.yml downMocks
In many cases you will be not using full existing infrastructure but mocked one. In our example our Book BFF service can use mocks instead of real services. This will be very important in the next workshops which will focus on the local development for the FrontEnd services. We have special docker compose file prepared to show this flow.
docker-compose -f compose-mocked.yml up -dIn our example we are using the most dumb mocks possible what means there will be no reaction in them on changes done by UPDATE and/or DELETE type of operations. It is not important and in most of the cases enough to develop BFF app and FrontEnd aps which will be using this service.
Please start again your application with serve.sh script :
./scripts/serve.shNow just visit Swagger UI in your browser and check if service is working properly.
When you will finish your work please stop your serving application with Ctrl+C.
Please also turn off all containers when you will finish this section with command:
docker-compose -f compose-mocked.yml downContinuous Delivery and end-to-end testing
To be sure that our application is deliverable we need to check if docker containers we will end with are correct and will build with success in the CI.
Because in many cases we like to have testing, packaging service and building docker containers in separate jobs in the CI
it is highly possible that we will be using single stage docker files. To be sure that in this example we will end with
usable for them binaries to test this please run build-linux.sh script:
./scripts/build.sh linuxThis script will prepare binary version of our service for linux used in the container and for the architecture we are using in this container.
Now just run build-single-stage-container.sh script:
./scripts/build-single-stage-container.shto check if prepared Dockerfile single-stage.Dockerfile works correctly.
In other cases we will have multi-stage Dockerfile multi-stage.Dockerfile. Those files have multiple stages
and only last stage is something what will end as the docker image. Stages before it are to prepare all required files
for the last stage to ends with as minimal image as possible. In our example first stage is building binary of our
service.
 1
 2
 3
 4
 5
 6
 7
 8
 9
10
11
12
FROM golang:latest AS builder (1)
WORKDIR /go/src/gitlab.com/devops-training-info/examples/go/gorilla-web-toolkit/book-bff
ADD . ./
RUN ./scripts/build.sh linux (2)

FROM alpine:latest (3)
RUN mkdir -p "/var/application"
COPY internal/web/static /var/application/public
COPY --from=builder /go/src/gitlab.com/devops-training-info/examples/go/gorilla-web-toolkit/book-bff/book-bff /bin/book-bff (4)
EXPOSE 8080
ENTRYPOINT ["/bin/book-bff"]
CMD ["serve", "--config", "/secrets/local.env.yaml", "-b", "0.0.0.0", "-p", "8080", "-c"]
| 1 | Starting first stage we are naming here builder by taking as a source golang:latest image @1 |
| 2 | We are building binary of our application using our prepare script |
| 3 | Now we are starting our final stage, and we are using very small image alpine:latest |
| 4 | We are copying our generated in the build stage binary to this one |
Our local environment which we will be using for end-to-end testing is based on this docker image and docker-compose.
Please first build your image using this shell command:
docker-compose -f compose-test.yml buildNow you can start it:
docker-compose -f compose-test.yml upYou will have now environment very useful for developing end-to-end tests which will be used in the CI or just to do manual testing like in our case.
Now we can use Bruno CLI to check if our service works properly
./scripts/local-e2e.shour output should look similar to this:
up to date, audited 2 packages in 364ms

1 package is looking for funding
  run `npm fund` for details

found 0 vulnerabilities
v1/books/List Books (200 OK) - 6 ms
Assertions
   ✓ res.status: eq 200

...

v1/Get Health (200 OK) - 0 ms
Assertions
   ✓ res.status: eq 200
   ✓ res.body.status: eq 200
   ✓ res.body.message: eq "book-list api health"
   ✓ res.body.content.alive: eq true
   ✓ res.body.content.postgres: eq true

Requests:    10 passed, 10 total
Tests:       0 passed, 0 total
Assertions:  102 passed, 102 total
Ran all requests - 20 ms

Requests:    10 passed, 10 total
Tests:       0 passed, 0 total
Assertions:  102 passed, 102 total
Wrote json results to ../../results.json
When you will finish please remember to stop your containers with Ctrl+C.
Continuous Security Testing
You can check if this service is passing security tests by running script local-scan.sh:
./scripts/local-scan.shYour output should look similar to this:
[+] Building 7.4s (14/14) FINISHED                                                                                                                                                                                     docker:default
 => [internal] load build definition from multi-stage.Dockerfile                                                                                                                                                                 0.0s
 => => transferring dockerfile: 564B                                                                                                                                                                                             0.0s
 => [internal] load metadata for docker.io/library/alpine:latest                                                                                                                                                                 0.6s
 => [internal] load metadata for docker.io/library/golang:latest                                                                                                                                                                 0.8s
 => [internal] load .dockerignore                                                                                                                                                                                                0.0s
 => => transferring context: 340B                                                                                                                                                                                                0.0s
 => CACHED [builder 1/4] FROM docker.io/library/golang:latest@sha256:2981696eed011d747340d7252620932677929cce7d2d539602f56a8d7e9b660b                                                                                            0.0s
 => [internal] load build context                                                                                                                                                                                                0.4s
 => => transferring context: 38.35MB                                                                                                                                                                                             0.3s
 => [stage-1 1/4] FROM docker.io/library/alpine:latest@sha256:5b10f432ef3da1b8d4c7eb6c487f2f5a8f096bc91145e68878dd4a5019afde11                                                                                                   0.0s
 => [builder 2/4] WORKDIR /go/src/gitlab.com/devops-training-info/examples/go/gorilla-web-toolkit/book-bff                                                                                                                       0.0s
 => [builder 3/4] ADD . ./                                                                                                                                                                                                       0.3s
 => [builder 4/4] RUN ./scripts/build.sh linux                                                                                                                                                                                   5.6s
 => CACHED [stage-1 2/4] RUN mkdir -p "/var/application"                                                                                                                                                                         0.0s
 => CACHED [stage-1 3/4] COPY internal/web/static /var/application/public                                                                                                                                                        0.0s
 => [stage-1 4/4] COPY --from=builder /go/src/gitlab.com/devops-training-info/examples/go/gorilla-web-toolkit/book-bff/book-bff /bin/book-bff                                                                                    0.0s
 => exporting to image                                                                                                                                                                                                           0.0s
 => => exporting layers                                                                                                                                                                                                          0.0s
 => => writing image sha256:b588e57acf8ab948511047e43bd5f7e80bac898bd8c2223827cf6b2dee0a62ed                                                                                                                                     0.0s
 => => naming to docker.io/library/book-bff:latest                                                                                                                                                                               0.0s
Version: 0.70.0
...
Report Summary

┌─────────────────────────────────┬──────────┬─────────────────┬─────────┐
│             Target              │   Type   │ Vulnerabilities │ Secrets │
├─────────────────────────────────┼──────────┼─────────────────┼─────────┤
│ book-bff:latest (alpine 3.23.4) │  alpine  │        0        │    -    │
├─────────────────────────────────┼──────────┼─────────────────┼─────────┤
│ bin/book-bff                    │ gobinary │        2        │    -    │
└─────────────────────────────────┴──────────┴─────────────────┴─────────┘
Legend:
- '-': Not scanned
- '0': Clean (no security findings detected)


bin/book-bff (gobinary)

Total: 2 (MEDIUM: 2, HIGH: 0, CRITICAL: 0)

┌─────────────────────┬────────────────┬──────────┬────────┬───────────────────┬───────────────┬─────────────────────────────────────────────────────────────┐
│       Library       │ Vulnerability  │ Severity │ Status │ Installed Version │ Fixed Version │                            Title                            │
├─────────────────────┼────────────────┼──────────┼────────┼───────────────────┼───────────────┼─────────────────────────────────────────────────────────────┤
│ golang.org/x/crypto │ CVE-2025-47914 │ MEDIUM   │ fixed  │ v0.42.0           │ 0.45.0        │ golang.org/x/crypto/ssh/agent: SSH Agent servers: Denial of │
│                     │                │          │        │                   │               │ Service due to malformed messages                           │
│                     │                │          │        │                   │               │ https://avd.aquasec.com/nvd/cve-2025-47914                  │
│                     ├────────────────┤          │        │                   │               ├─────────────────────────────────────────────────────────────┤
│                     │ CVE-2025-58181 │          │        │                   │               │ golang.org/x/crypto/ssh: golang.org/x/crypto/ssh: Denial of │
│                     │                │          │        │                   │               │ Service via unbounded memory consumption in GSSAPI          │
│                     │                │          │        │                   │               │ authentication...                                           │
│                     │                │          │        │                   │               │ https://avd.aquasec.com/nvd/cve-2025-58181                  │
└─────────────────────┴────────────────┴──────────┴────────┴───────────────────┴───────────────┴─────────────────────────────────────────────────────────────┘
Now please try to scan in a similar way using grype tool instead of trivy.
Compare results and think why we can have different results using different scanning tools.
To generate SBOM report for our applications we need to use prepared script scripts/local-sbom.sh.
|
Please run it:
./scripts/local-sbom.shIn the end you should see new file: syft-sbom.json. Please review it.
Continuous Deployment Testing
To test if our service is ready for the deployment to the Kubernetes cluster we will use our local K3s installation.
|
I’m assuming that you already created cluster |
Let us check if everything is working just please use our deploy-k3s.sh:
./scripts/deploy-k3s.shDepends on what you will choose - or you will see what will be sent to the cluster, or you will do a deployment, or both.
If you decided to deploy your application you can check how the deployment goes with the help of k9s tool:
k9s -n servicesExtra: Multiplatform
You can check how our multiplatform container build example work by running script multiplatform.build-multi-stage-container.sh:
./scripts/multiplatform.build-multi-stage-container.shYour output should look similar to this:
[+] Building 0.8s (21/21) FINISHED docker-container:multiplatform-builder
=> [internal] load build definition from multiplatform.multi-stage.Dockerfile 0.0s
=> => transferring dockerfile: 881B 0.0s
=> [linux/arm64 internal] load metadata for docker.io/library/alpine:latest 0.4s
=> [linux/amd64 internal] load metadata for docker.io/library/alpine:latest 0.4s
=> [linux/arm64 internal] load metadata for docker.io/library/golang:1.22-alpine 0.4s
=> [internal] load .dockerignore 0.0s
=> => transferring context: 340B 0.0s
=> [linux/amd64 stage-1 1/4] FROM docker.io/library/alpine:latest@sha256:77726ef6b57ddf65bb551896826ec38bc3e53f75cdde31354fbffb4f25238ebd 0.0s
=> => resolve docker.io/library/alpine:latest@sha256:77726ef6b57ddf65bb551896826ec38bc3e53f75cdde31354fbffb4f25238ebd 0.0s
=> [internal] load build context 0.3s
=> => transferring context: 423.35kB 0.3s
=> [linux/arm64 builder 1/6] FROM docker.io/library/golang:1.22-alpine@sha256:9bdd5692d39acc3f8d0ea6f81327f87ac6b473dd29a2b6006df362bff48dd1f8 0.0s
=> => resolve docker.io/library/golang:1.22-alpine@sha256:9bdd5692d39acc3f8d0ea6f81327f87ac6b473dd29a2b6006df362bff48dd1f8 0.0s
=> [linux/arm64 stage-1 1/4] FROM docker.io/library/alpine:latest@sha256:77726ef6b57ddf65bb551896826ec38bc3e53f75cdde31354fbffb4f25238ebd 0.0s
=> => resolve docker.io/library/alpine:latest@sha256:77726ef6b57ddf65bb551896826ec38bc3e53f75cdde31354fbffb4f25238ebd 0.0s
=> CACHED [linux/amd64 stage-1 2/4] RUN mkdir -p "/var/application" 0.0s
=> CACHED [linux/amd64 stage-1 3/4] COPY public /var/application/public 0.0s
=> CACHED [linux/arm64 builder 2/6] WORKDIR /go/src/gitlab.com/mobica-workshops/examples/go/gorilla/book-bff 0.0s
=> CACHED [linux/arm64 builder 3/6] COPY go.mod go.sum ./ 0.0s
=> CACHED [linux/arm64 builder 4/6] RUN go mod download 0.0s
=> CACHED [linux/arm64 builder 5/6] ADD . ./ 0.0s
=> CACHED [linux/arm64->amd64 builder 6/6] RUN --mount=target=.:rw --mount=type=cache,target=/root/.cache/go-build --mount=type=cache,target=/go/pkg GOOS=linux GOARCH=amd64 go build -o book-bff . 0.0s
=> CACHED [linux/amd64 stage-1 4/4] COPY --from=builder /go/src/gitlab.com/mobica-workshops/examples/go/gorilla/book-bff/book-bff /bin/book-bff 0.0s
=> CACHED [linux/arm64 stage-1 2/4] RUN mkdir -p "/var/application" 0.0s
=> CACHED [linux/arm64 stage-1 3/4] COPY public /var/application/public 0.0s
=> CACHED [linux/arm64 builder 6/6] RUN --mount=target=.:rw --mount=type=cache,target=/root/.cache/go-build --mount=type=cache,target=/go/pkg GOOS=linux GOARCH=arm64 go build -o book-bff . 0.0s
=> CACHED [linux/arm64 stage-1 4/4] COPY --from=builder /go/src/gitlab.com/mobica-workshops/examples/go/gorilla/book-bff/book-bff /bin/book-bff 0.0s
WARNING: No output specified with docker-container driver. Build result will only remain in the build cache. To push result image into registry use --push or to load image into docker use --load|
To fix this issue: You need to add and information similar to this: |
What Next
Learning paths
After this workshop you can take those learning paths:
-
A Cloud Guru Containers and Kubernetes related trainings - where you can learn more about Docker, Kubernetes, and Helm
-
A Cloud Guru DevOps automation related trainings - where you can learn more about Configuration Management tools like by example Ansible and many type of Pipelines
Next workshops in the microservices series
Frontend
For a Frontend developers we plan to release soon:
-
Frontend local development with Docker and K3s for project using microservices architecture
It will be using book-bff which was shown at this workshops and will introduce JavaScript based front service book-frontend.
DevOps Automator and QA
For a DevOps Automator and QA engineers we plan to release:
-
Continuous Integration, and Continuous Delivery/Deployment for project using microservices architecture with a help of the GITLAB platform. Delivery/Deployment will be targeting prepared K8s cluster.
It will be focusing mostly on Gitlab CI as an example of pipeline tool and what this tool can give us. Workshop is ready and a firs edition will be announced soon.
Infrastructure
For Cloud Infrastructure Engineers and SysOps:
-
Preparing and using Infrastructure required for the projects using microservices architecture with the help of the Kubernetes, Clouds, Ansible, and Terraform.
Like in the title we will be creating mainly Cloud Infrastructure with a help of Terraform and other mentioned tools. It is possible that also bare metal will be mentioned and example prepared.
Related Open Source project:
We have also a special OpenSource project MOB175:
-
Preparing examples used in the workshops series connected to the microservices architecture.
Anyone who is interested can join in a free time and people who are currently without project can let us know if wanted to join this project. Please contact me to gain more details.
Cleanup
You can remove created K3d cluster created with this command:
k3d cluster delete bookClusterYou can cleanup your docker engine with this command:
docker system prune -a --volumesAll tools installed with a help of the brew can be uninstalled with the command brew uninstall plus tool name.
brew uninstall tool-nameQnA
Waiting for Questions :)
![]() This work is licensed under a Creative Commons Attribution 4.0 International License
This work is licensed under a Creative Commons Attribution 4.0 International License